When you think of grip strength, you may think of powerlifters or rock climbers — or simply opening that stubborn pickle jar. But did you know that the benefits of working to improve grip strength go far beyond physical? We’re here to talk about the surprising benefits of grip strength, from improved lifting form and results to its ties to longevity and holistic health. We’ll cover:
- The importance of grip strength
- How to measure grip strength
- How to improve grip strength
- 10 grip strength exercises (plus five wrist and forearm mobility stretches)
What is grip strength — and why does it matter?
Put simply, grip strength is the amount of force exerted by the hand and forearm. The flexor muscles are responsible for the force of the grip, and the extensor muscles of the forearm provide stability. There are three types of grip strength:
- Crushing (fingers to palm)
- Pinching (fingers to thumb)
- Supporting (carrying a load for a distance or time)
In general, the better your grip strength, the stronger your entire body is. Grip strength is often overlooked in traditional strength and athletic training programs, but it’s critical to performance in sports as well as daily activities. (Think: Opening a jar, using a wrench, or carrying groceries.) Learning how to improve grip strength and muscle endurance allows you to lift heavier for longer and therefore achieve better results.
What about weak grip strength? As we age, our bodies naturally lose muscle mass, strength, and function — this is known as sarcopenia, and it can impact your workouts and your daily life. Thankfully, regular strength training, balanced nutrition, and ample rest and recovery can delay — and even reverse — these effects.
The importance of grip strength for quality of life and longevity
The benefits of grip strength go beyond physical function and more effective lifts. Higher grip strength measurements taken with a handheld device are also associated with:
- Stronger bones (higher bone mineral density) and fewer fractures
- A reduced fall risk
- A better nutritional profile
- Better cognitive abilities
- Less depression
- Improved sleep
- A lower risk of diabetes
- A higher quality of life
Taken together, these benefits can contribute to increased longevity, helping you live better, longer.
How to measure grip strength
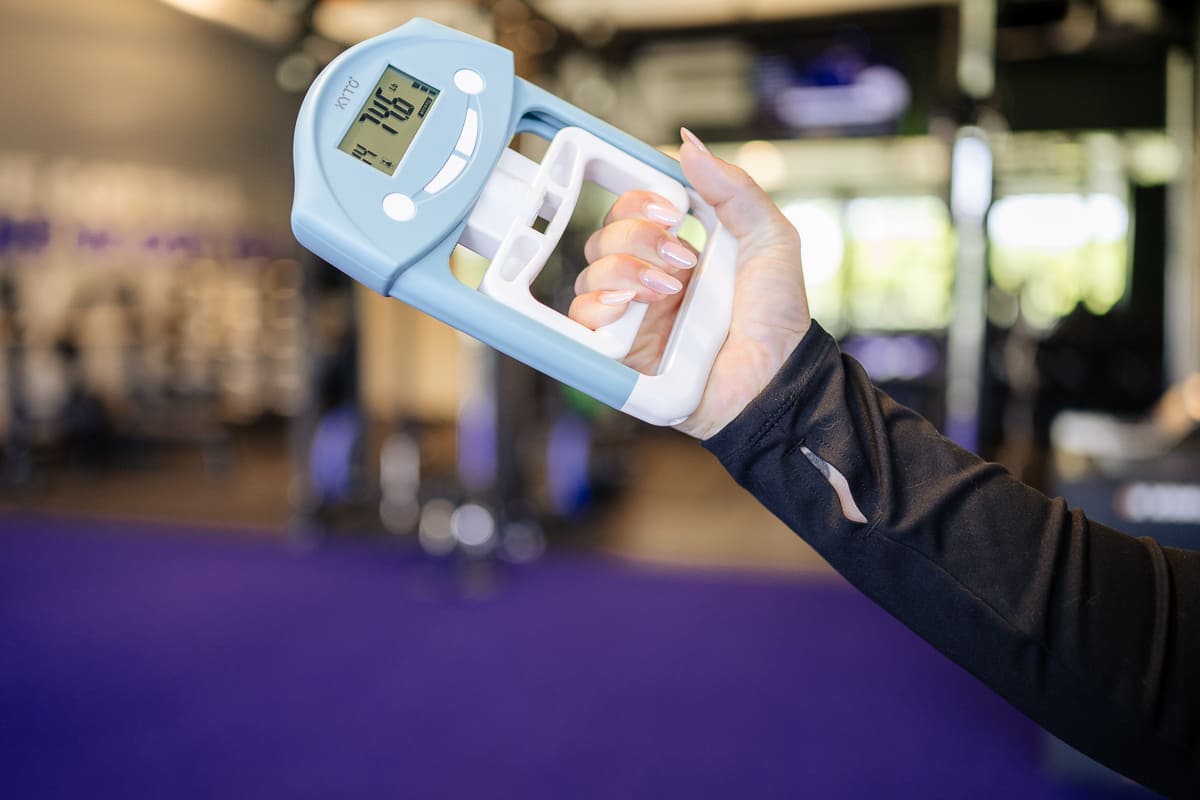
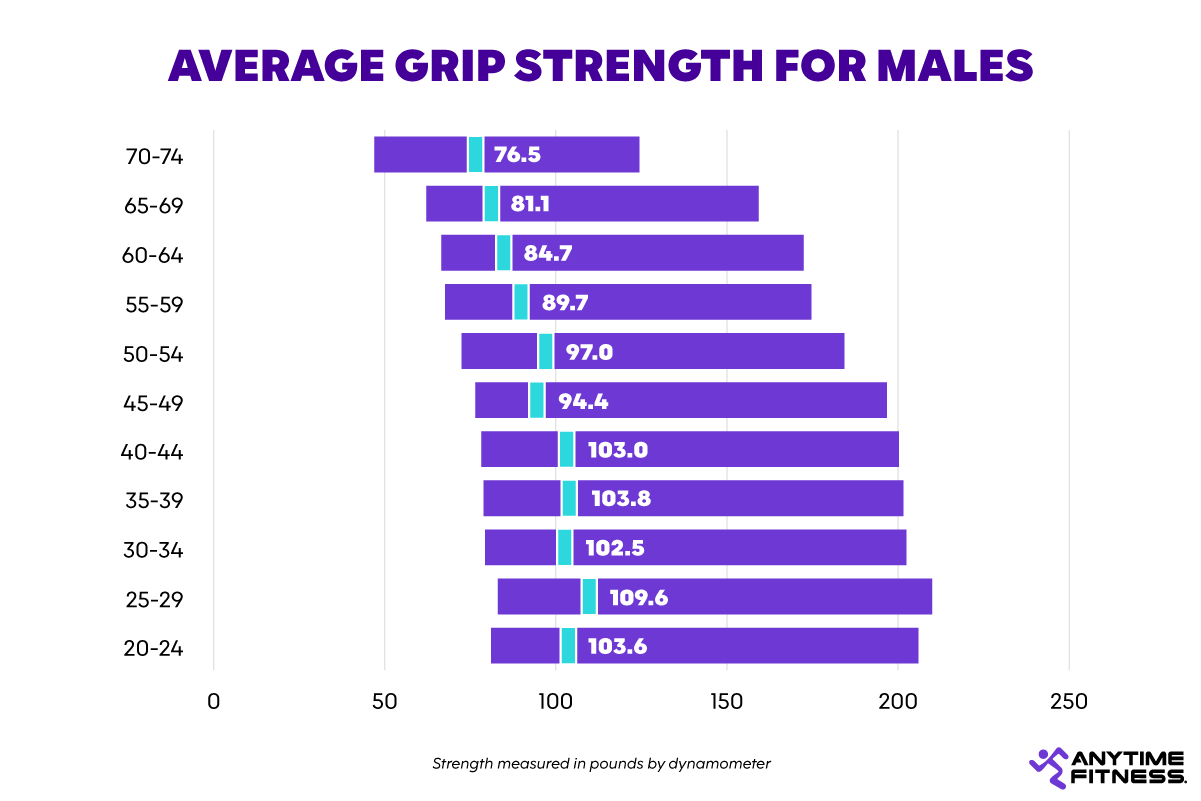
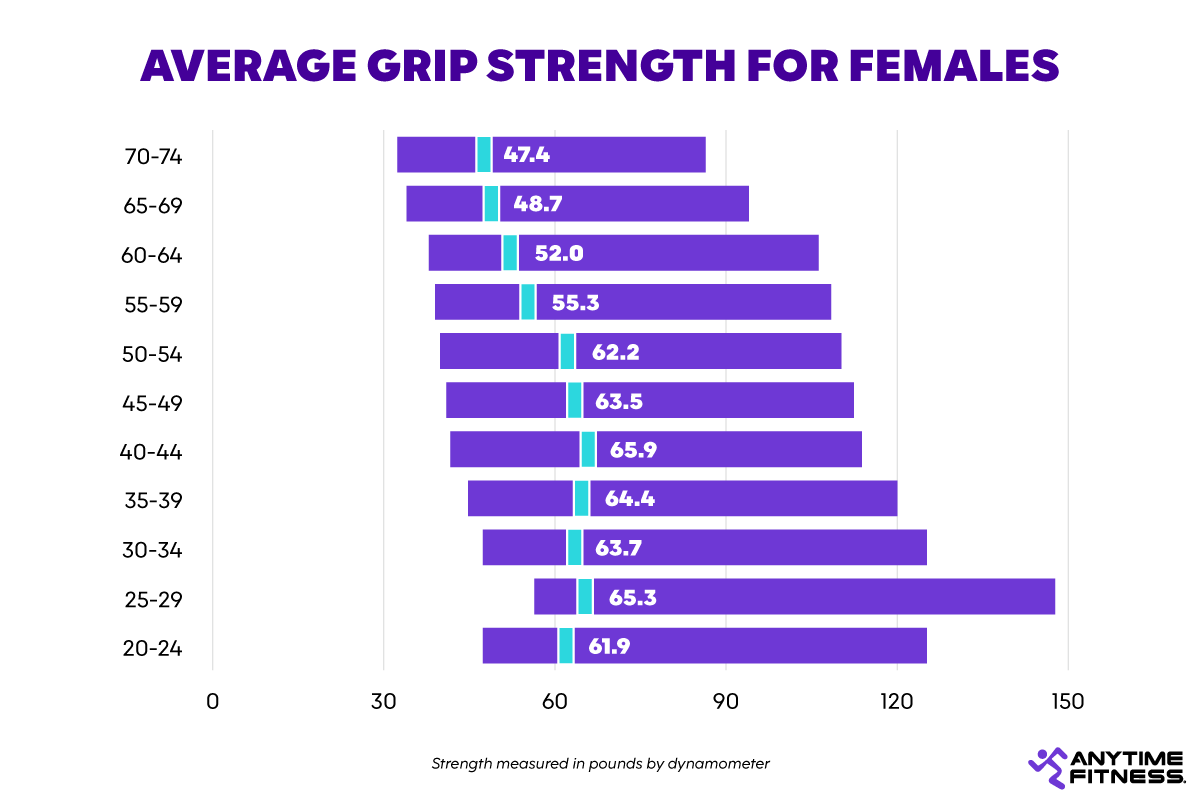
Grip strength is typically measured in pounds (lbs) or kilograms (kg) with a handheld device known as a dynamometer. Other devices use air pressure to measure grip strength and display readings in pounds per square inch (PSI). For our purposes, we’ll use pounds. Here’s how to use a dynamometer:
- Check your equipment. Make sure your dynamometer is calibrated properly according to the manufacturer's instructions. This ensures you get an accurate reading.
- Adjust the grip. The dynamometer handle should fit your hand snugly, not so loose it wobbles, but not so tight it’s uncomfortable. It should rest naturally in your palm.
- Perfect your grip technique. Wrap all four fingers around one side of the handle and your thumb around the other side.
- Get set up. Sit in a chair with your feet flat on the floor and rest your arm on a table or bench so you’re relaxed and steady. (Seated measurements are most consistent.) Keep your shoulder relaxed at your side and bend your elbow at a 90-degree angle. Your wrist should be mostly straight, with a slight bend back (no more than 30 degrees).
- Perform the test. Squeeze the handle as hard as you can and hold for three to five seconds. Go for maximum effort without jerking, shaking or straining your wrist. (If you feel pain, stop and ask a Coach or medical professional for help!)
- Rest and repeat. Recover for about one minute between attempts. Aim for three solid tries with each hand, alternating between attempts. This helps average out your true grip strength level.

If you don’t have a dynamometer on hand, you can also use a bathroom scale, squeezing the scale between your palms and fingers for three to five seconds. Another option: See how long you can perform a dead hang. The longer you can hold it, the stronger your grip.
How to improve grip strength
If your goal is to increase grip strength, be sure to include hand grip exercises in your gym routine (more on that later). To meet the recommended strength training minimums, your workout split should include 30 minutes of strength training at least two days per week.
Variability in your training routine is another key to improving your grip strength. This challenges your muscles in new ways and trains the different types of grip strength (pinching, crushing, and supporting).
Lastly, maintaining a healthy diet that’s rich in protein and carbs will provide the energy you need for regular strength training and support muscle growth.
The 10 best grip strength exercises
Now, let’s talk about how to increase grip strength through exercise. Here is a list of some of our favorite exercises to improve grip strength — use them together as a workout that targets the muscles in your back, biceps, forearms, and wrists, or intersperse them throughout your existing training split.
We’ve included the equipment you’ll need, a step-by-step guide, tips to get the most out of each exercise, and the type of grip associated with each exercise, including:
- Overhand (reverse): Holding the weight with your palms away from your body.
- Underhand: Holding the weight with your palms facing your body.
- Neutral: Holding the weight with your palms facing each other.
- Pinching: Holding the weight between your fingers and thumb.
Pro tip: To measure your progress, determine your grip strength monthly using a dynamometer — or track the number of sets and reps you’re able to complete for each exercise. With regular practice, you may notice you’re able to perform more reps before failure. You’ll also feel the results as everyday activities like lifting or using tools become easier.
1. Dead hangs
Type of grip: Overhand | Equipment needed: Overhead bar | Reps: 3-4 sets holding as long as possible
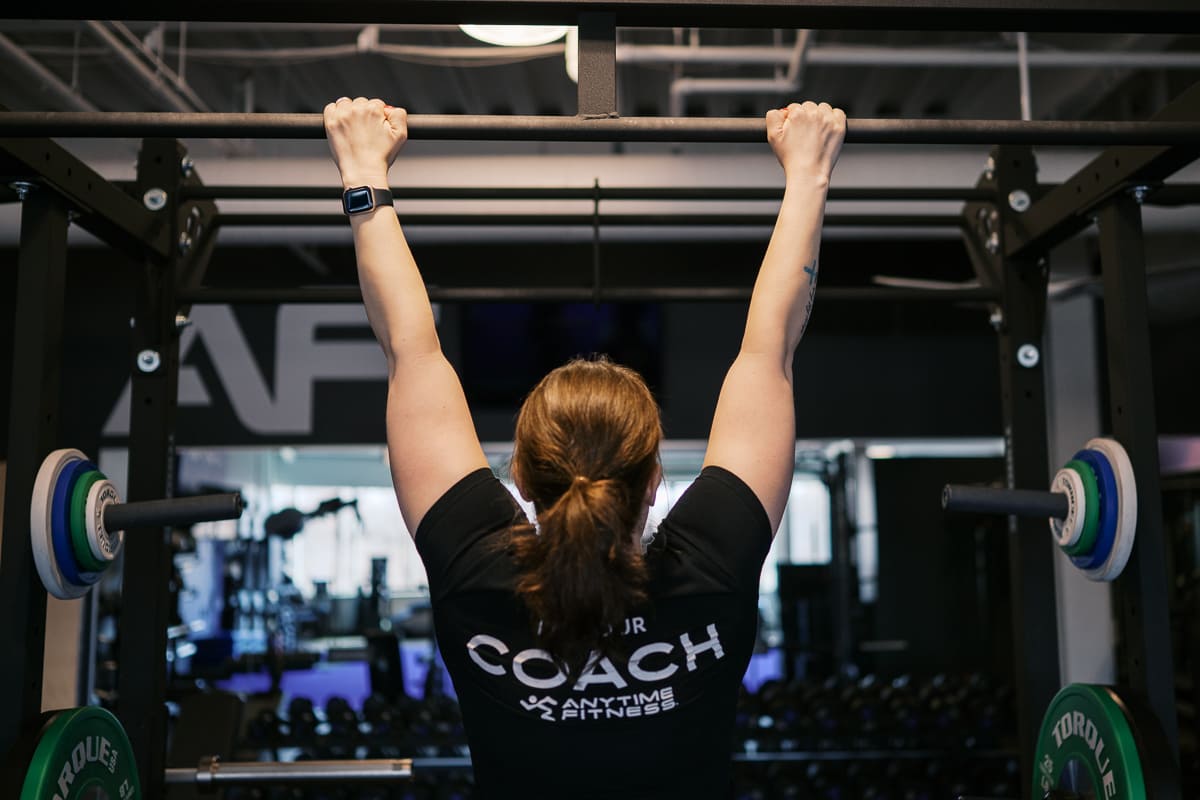
How to:
- Grip the pull-up bar with your hands about shoulder-width apart.
- Engage your shoulders slightly by performing a scapular depression (pull your shoulder blades down without bending your arms).
- Lift your feet off the floor, allowing your body to hang fully extended. Keep your spine neutral and core engaged.
- Maintain active tension through your lats and shoulders to avoid collapsing into a passive hang.
Pro tip: Use chalk for a better grip on the bar. (But make sure it’s allowed at your gym first!)
2. Deadlifts
Type of grip: Overhand | Equipment needed: Barbell, plates | Reps: 4-6 sets of 8-12 reps
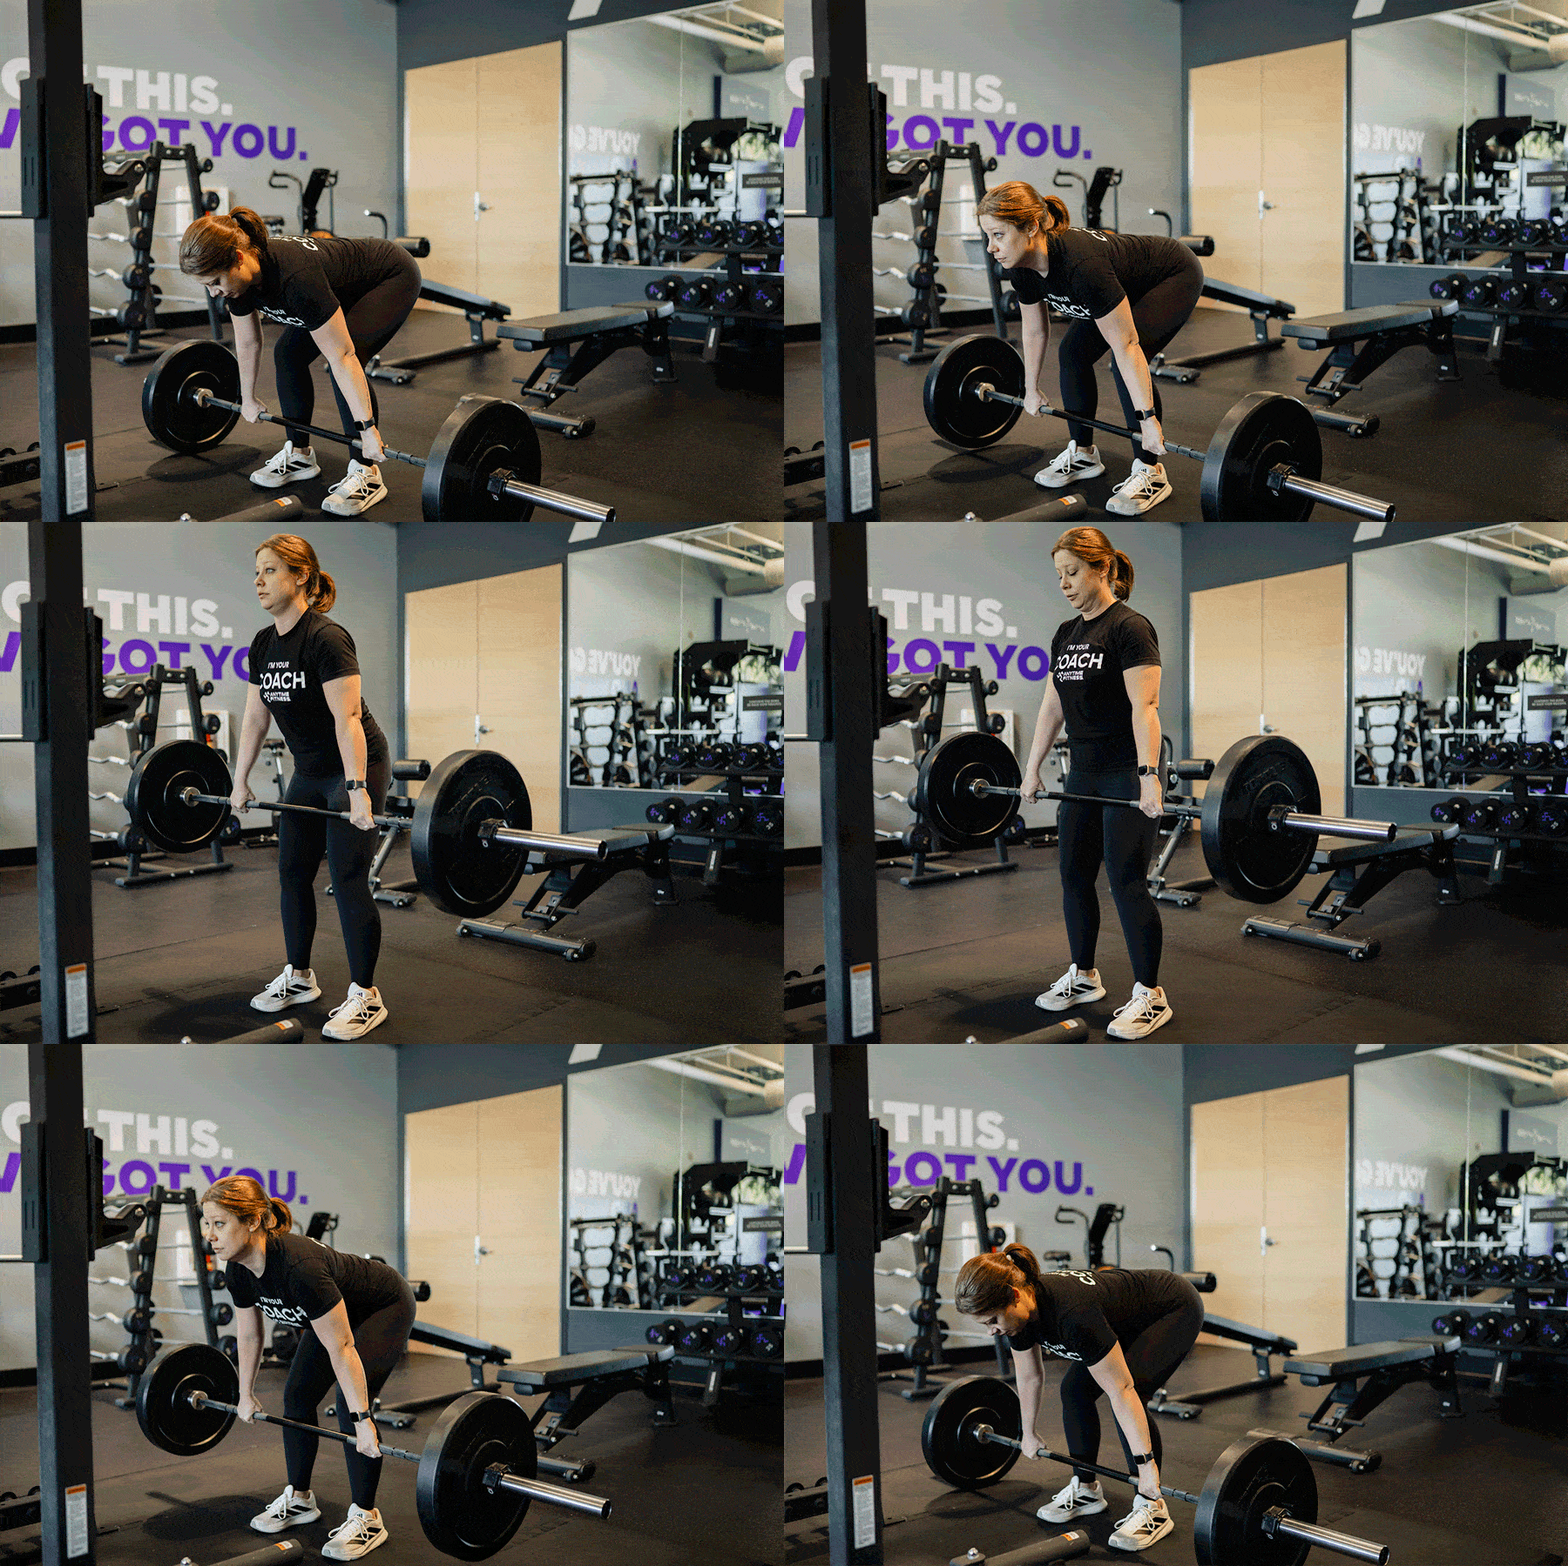
How to:
- Stand with your feet hip-width apart, toes slightly turned out, and the barbell positioned over your midfoot.
- Hinge at your hips and slightly bend your knees. Maintain a neutral spine as you lower to grip the bar just outside your knees with an overhand grip.
- Push your shoulder blades back and down to set your lats. Avoid shrugging.
- Brace your core, then drive through your heels to initiate the lift, extending your hips and knees simultaneously.
- Keep the barbell close to your body as you rise to a fully upright, locked-out position. Extend your hips and knees with your shoulders stacked over your hips.
- Reverse the movement by hinging at your hips first, allowing your knees to bend once the bar passes them.
- Maintain control as you slowly lower the bar to the floor.
Coach’s note: The number of sets and reps is meant to challenge your grip strength not only through a heavy load but also an increased volume (e.g., three sets of 10 vs. four sets of 12).
3. Pull-ups
Type of grip: Overhand | Equipment needed: Overhead bar | Reps: 3-4 sets to failure
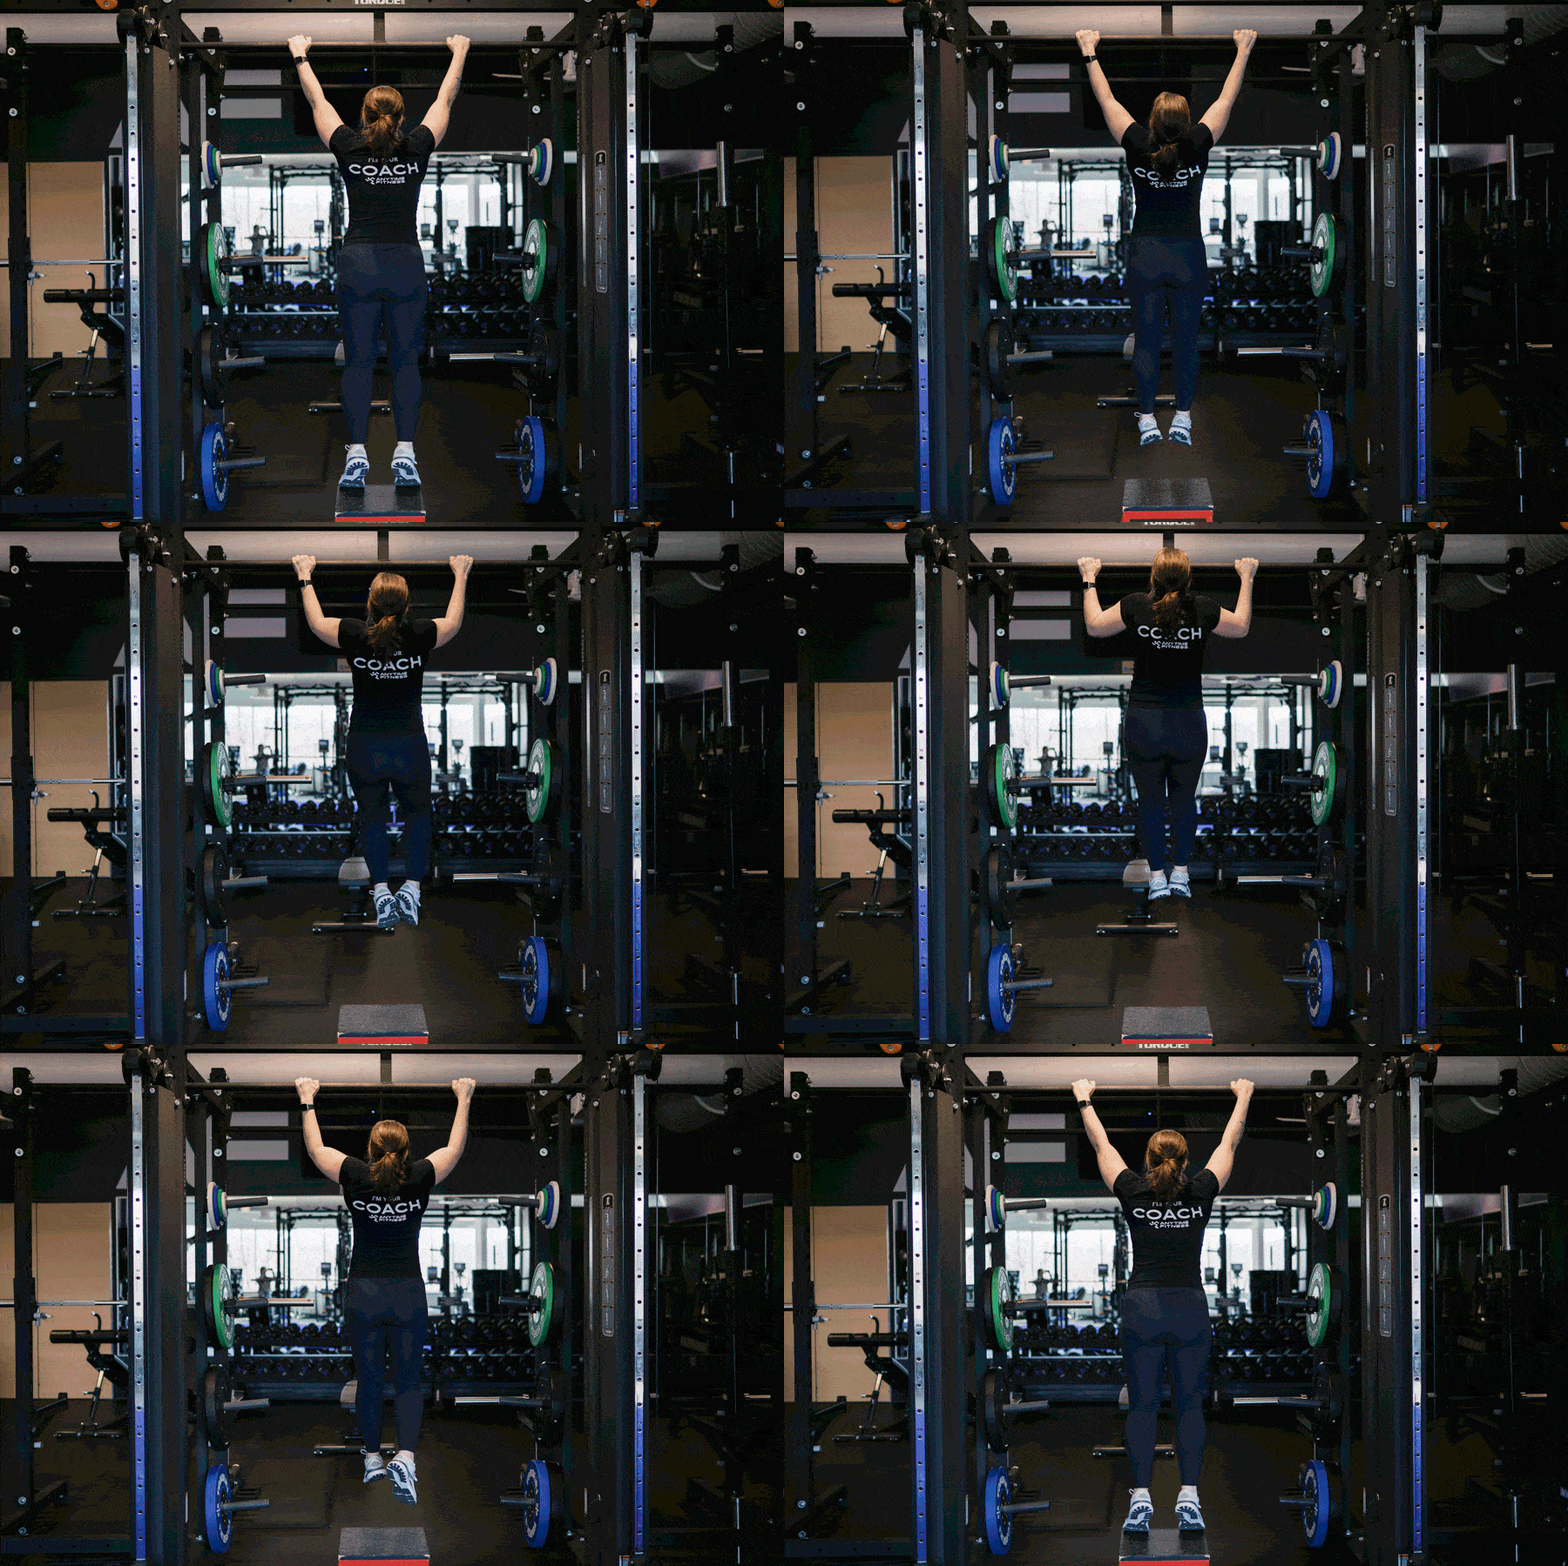
How to:
- Start in a dead hang position from an overhead bar. Use an overhand grip with your hands slightly farther than shoulder-width apart.
- Depress your shoulder blades and engage your lats to initiate the pull.
- Drive your elbows down toward your ribcage as you pull yourself up, keeping your body in a tight, hollow position. Visualize pulling your chest to the bar.
- Lead with your chest and aim to bring your chin clear over the bar.
- Pause briefly at the top, then lower yourself back to a full dead hang without swinging or losing core engagement.
Pro tip: To develop crushing (finger to palm) grip strength, loop a towel over the bar to do a towel pull-up.
4. Farmer carries
Type of grip: Neutral | Equipment needed: Two heavy kettlebells or dumbbells | Reps: Three to four 1-minute carries
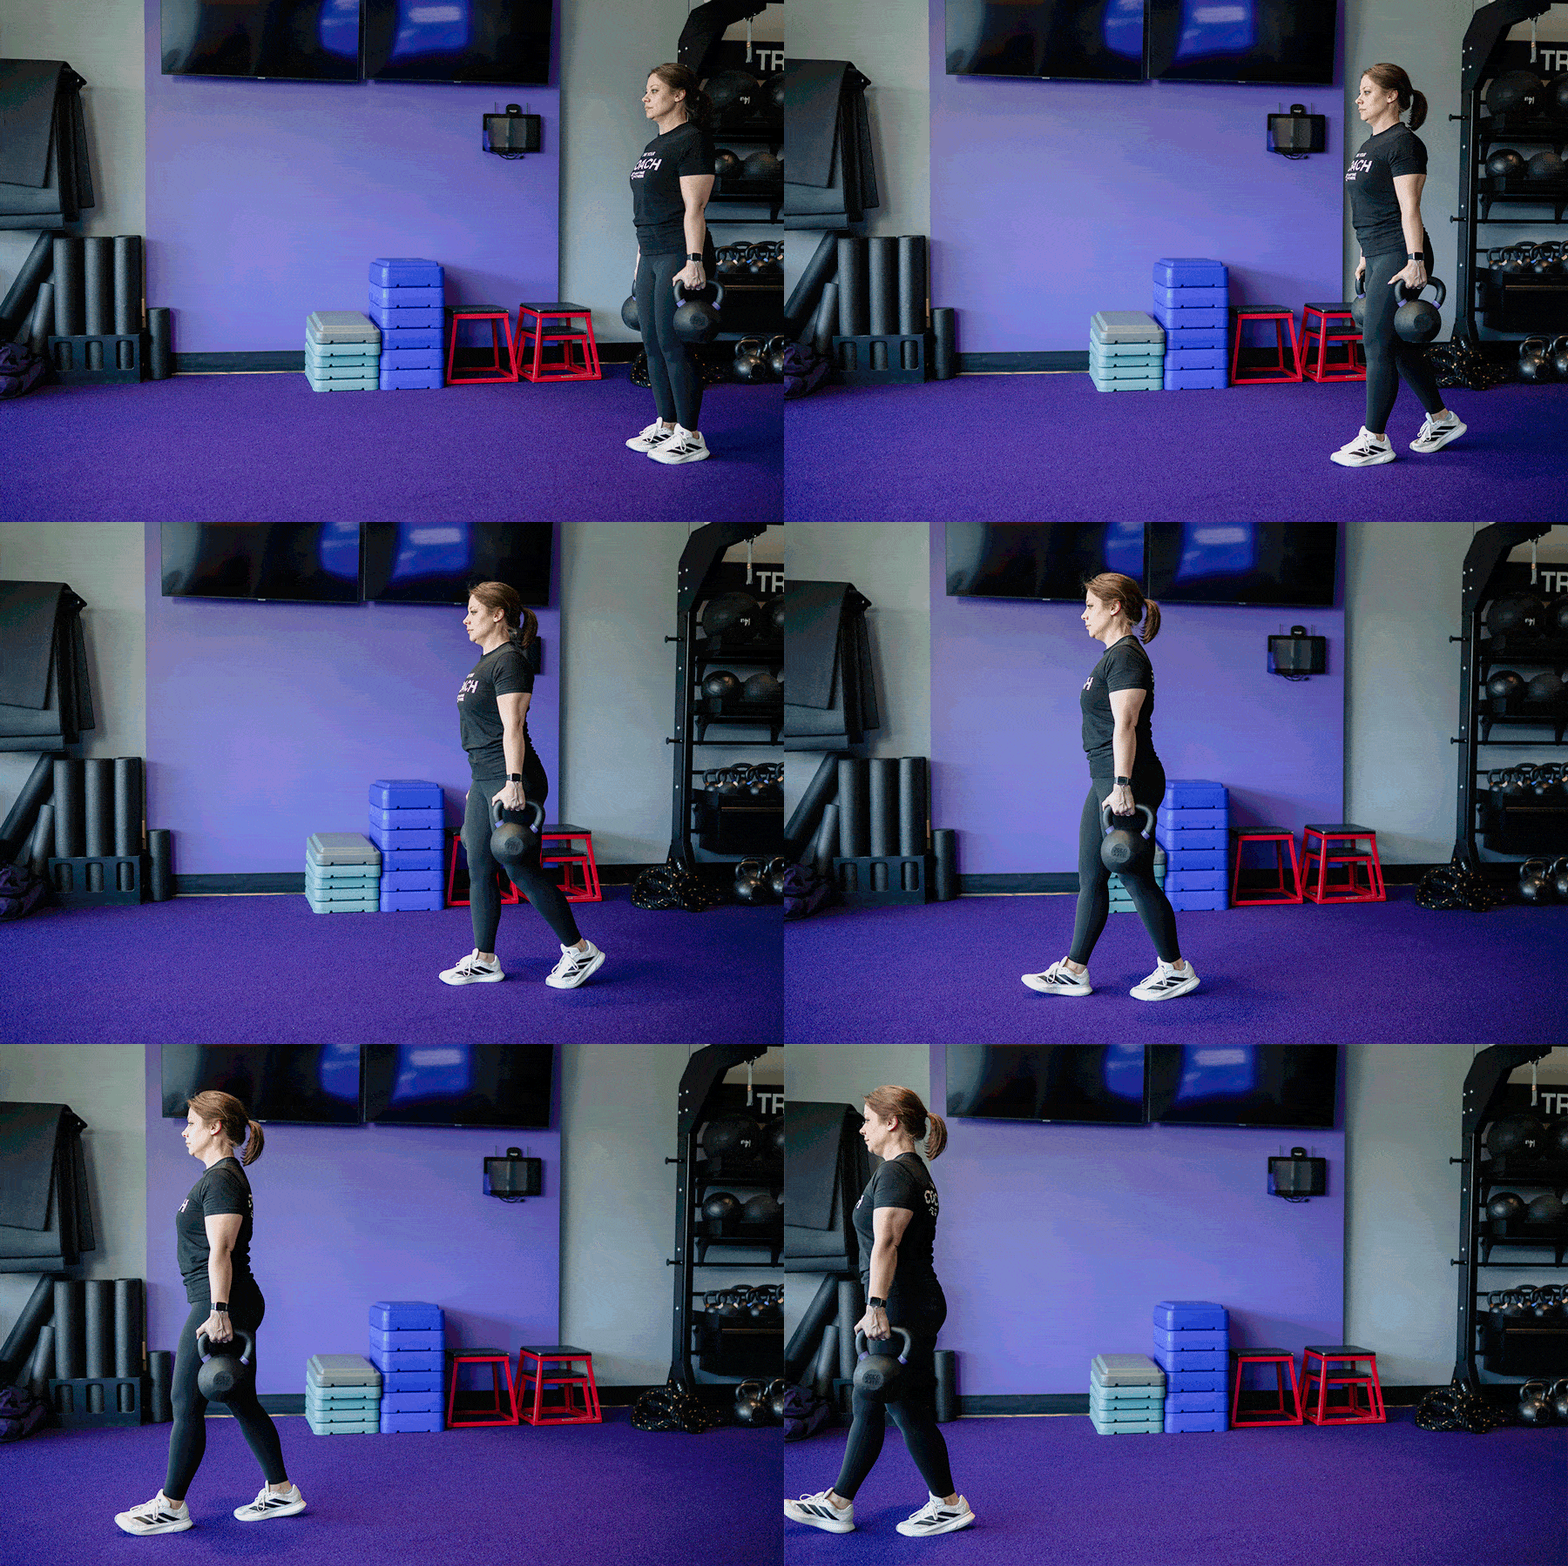
How to:
- Stand between two kettlebells and deadlift them to a tall, locked-out standing position with a neutral grip.
- Center the weights slightly away from your sides.
- Pull your shoulders back and down and engage your lats to stabilize the weights.
- Brace your core and walk forward with small, controlled steps. Maintain an upright posture and neutral spine throughout.
- Breathe steadily and avoid leaning to one side or letting the weights dictate your posture.
- Slowly lower the kettlebells down to the ground once you’ve completed your lap.
Pro tip: Adjust the duration based on the weight of your load. For example: one minute for moderate weight, 30 seconds for heavy weight.
5. Hammer curls
Type of grip: Neutral | Equipment needed: Two moderate to heavy dumbbells | Reps: 3-4 sets of 8-12 reps
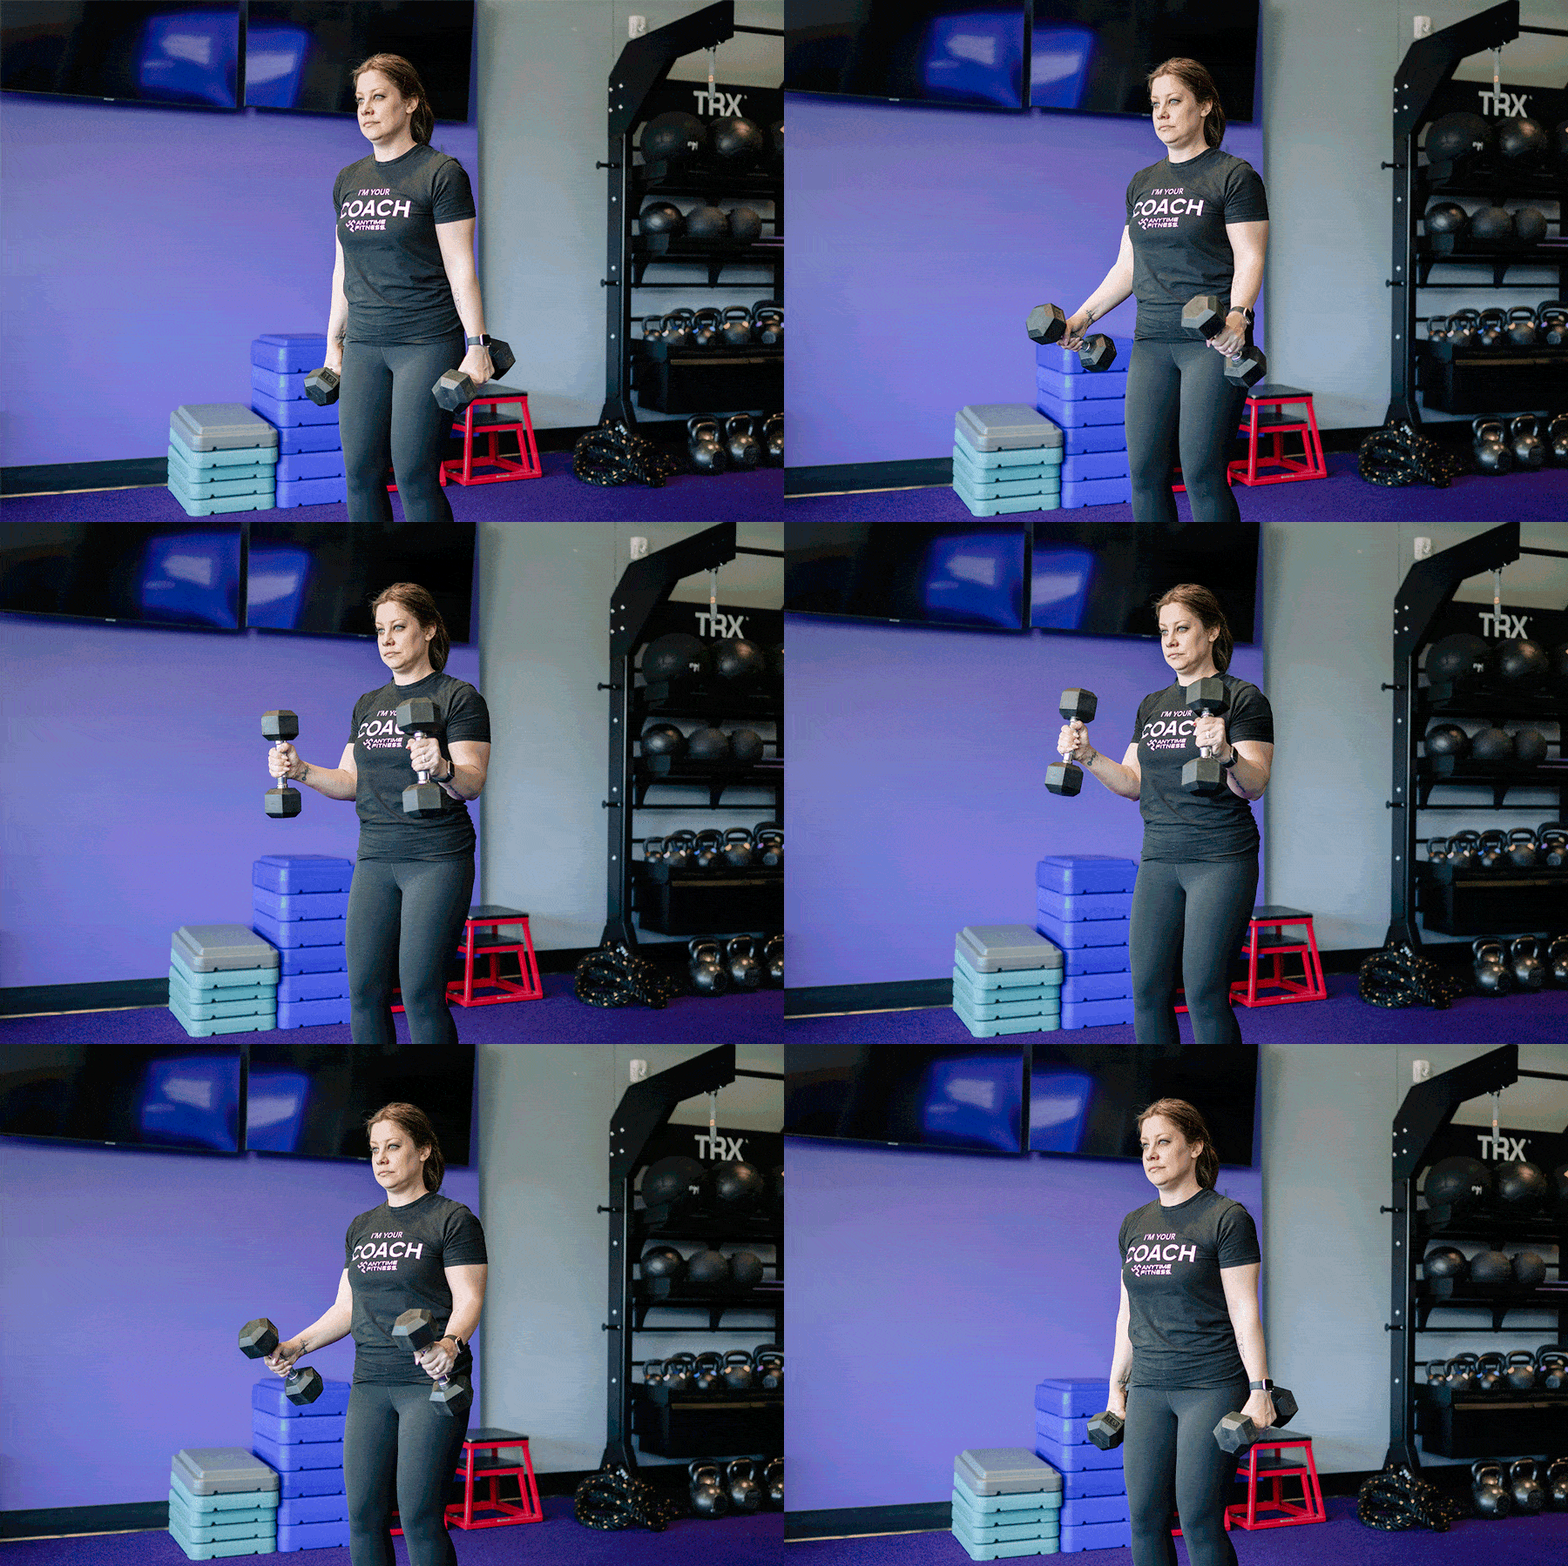
How to:
- Stand tall with a dumbbell in each hand, arms extended by your sides, and palms facing inward.
- Brace your core and bend at the elbows to curl the dumbbells up to shoulder height, keeping your wrists neutral.
- Lower the weights back to the starting position with control.
Pro tip: As fatigue sets in, switch to alternating arms rather than stopping completely. This keeps you moving while giving each arm a moment to recover.
6. Suitcase deadlifts
Type of grip: Neutral | Equipment needed: Two heavy kettlebells | Reps: 3-4 sets of 8-12 reps
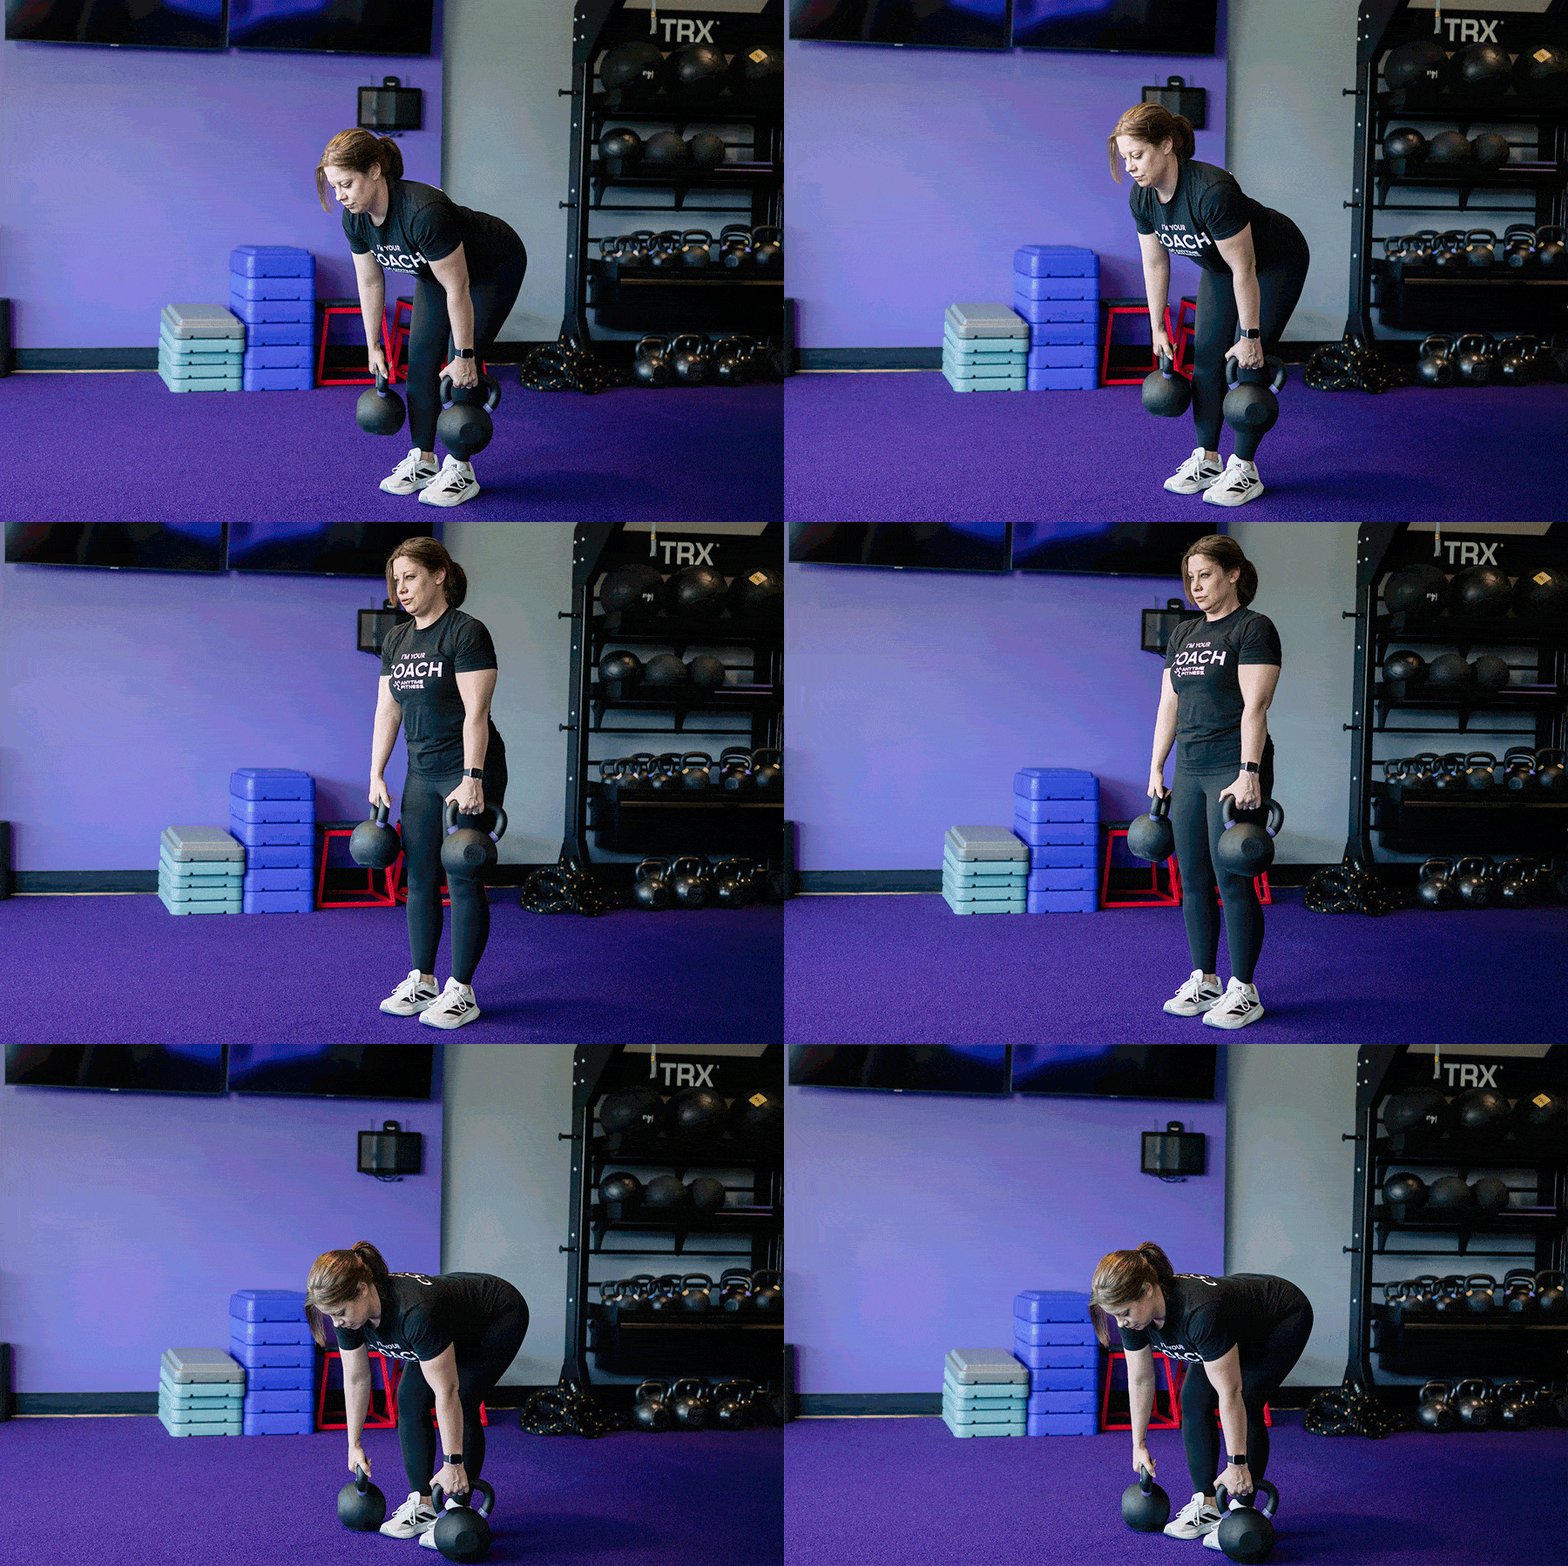
How to:
- Stand with your feet with your feet hip-width apart, with a kettlebell placed outside each foot.
- Hinge your hips back and slightly bend your knees, keeping your back flat. Grip the kettlebells and brace your core.
- Drive through your heels to stand tall. Keep the weights close to your body.
- Squeeze your glutes at the top, then lower the weights back to the ground with control.
Pro tip: If you have a shorter range of motion, stand on a low platform or box to deepen the hinge without letting the weights touch the ground too soon. This keeps tension in your hips and glutes — right where you want it.
7. Reverse grip bicep curls
Type of grip: Overhand (reverse) | Equipment needed: Light to moderate curl bar (or dumbbells) | Reps: 2-3 sets of 12-20 reps
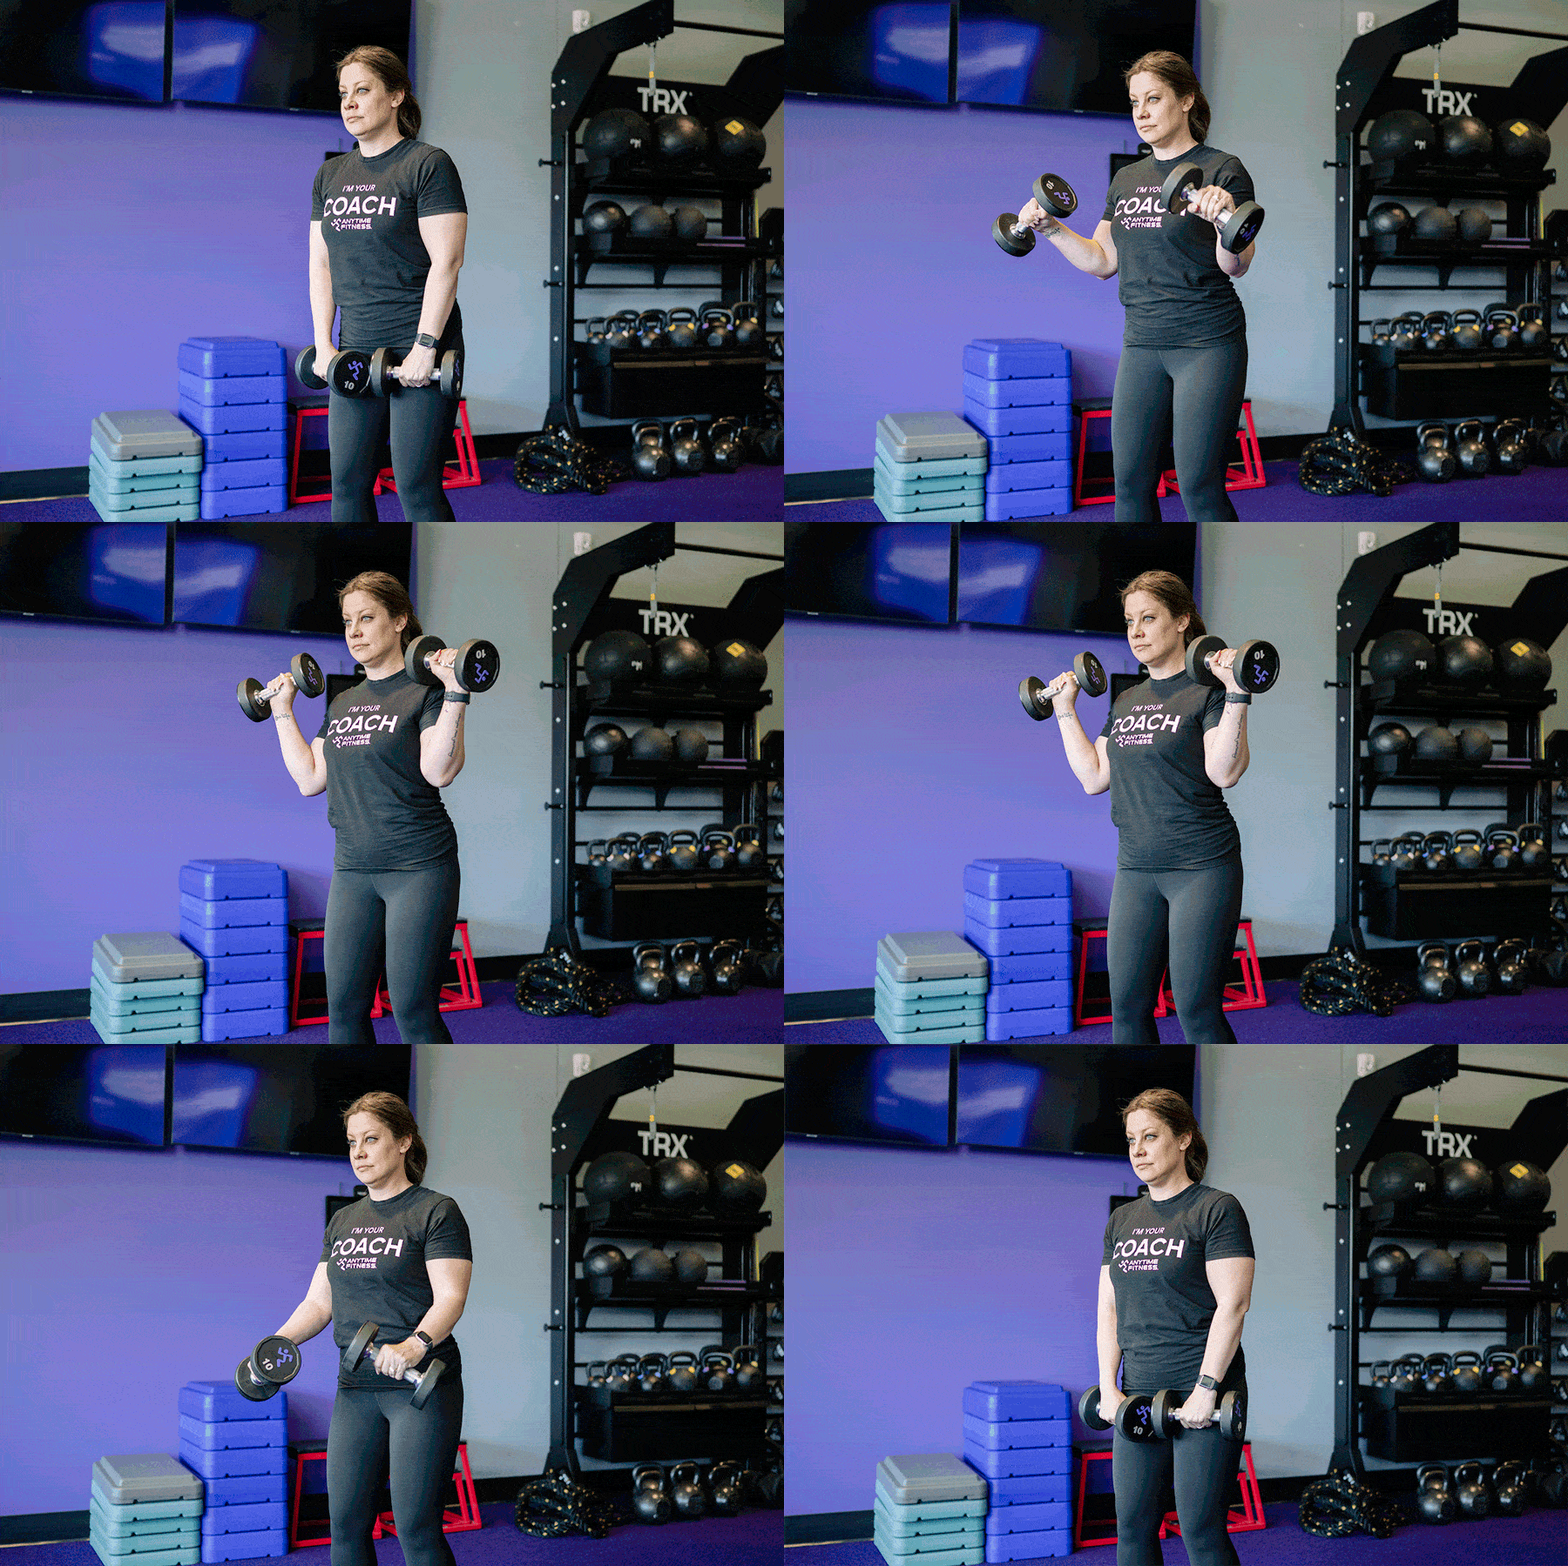
How to:
- Hold the barbell with an overhand grip, with your hands about shoulder-width apart and arms extended.
- Engage your core and stabilize your upper body.
- Curl the weight to shoulder height, keeping your elbows pinned close to your sides. Avoid using momentum to lift.
- Lower back down with control.
Pro tip: Choose a load that challenges you within the higher rep range without sacrificing your form. Strengthening the wrist extensors will pay off in bigger lifts that demand a powerful, stable grip.
8. Wrist flexion (wrist curls)
Type of grip: Underhand | Equipment needed: Two light dumbbells | Reps: 2-3 sets of 12-20 reps
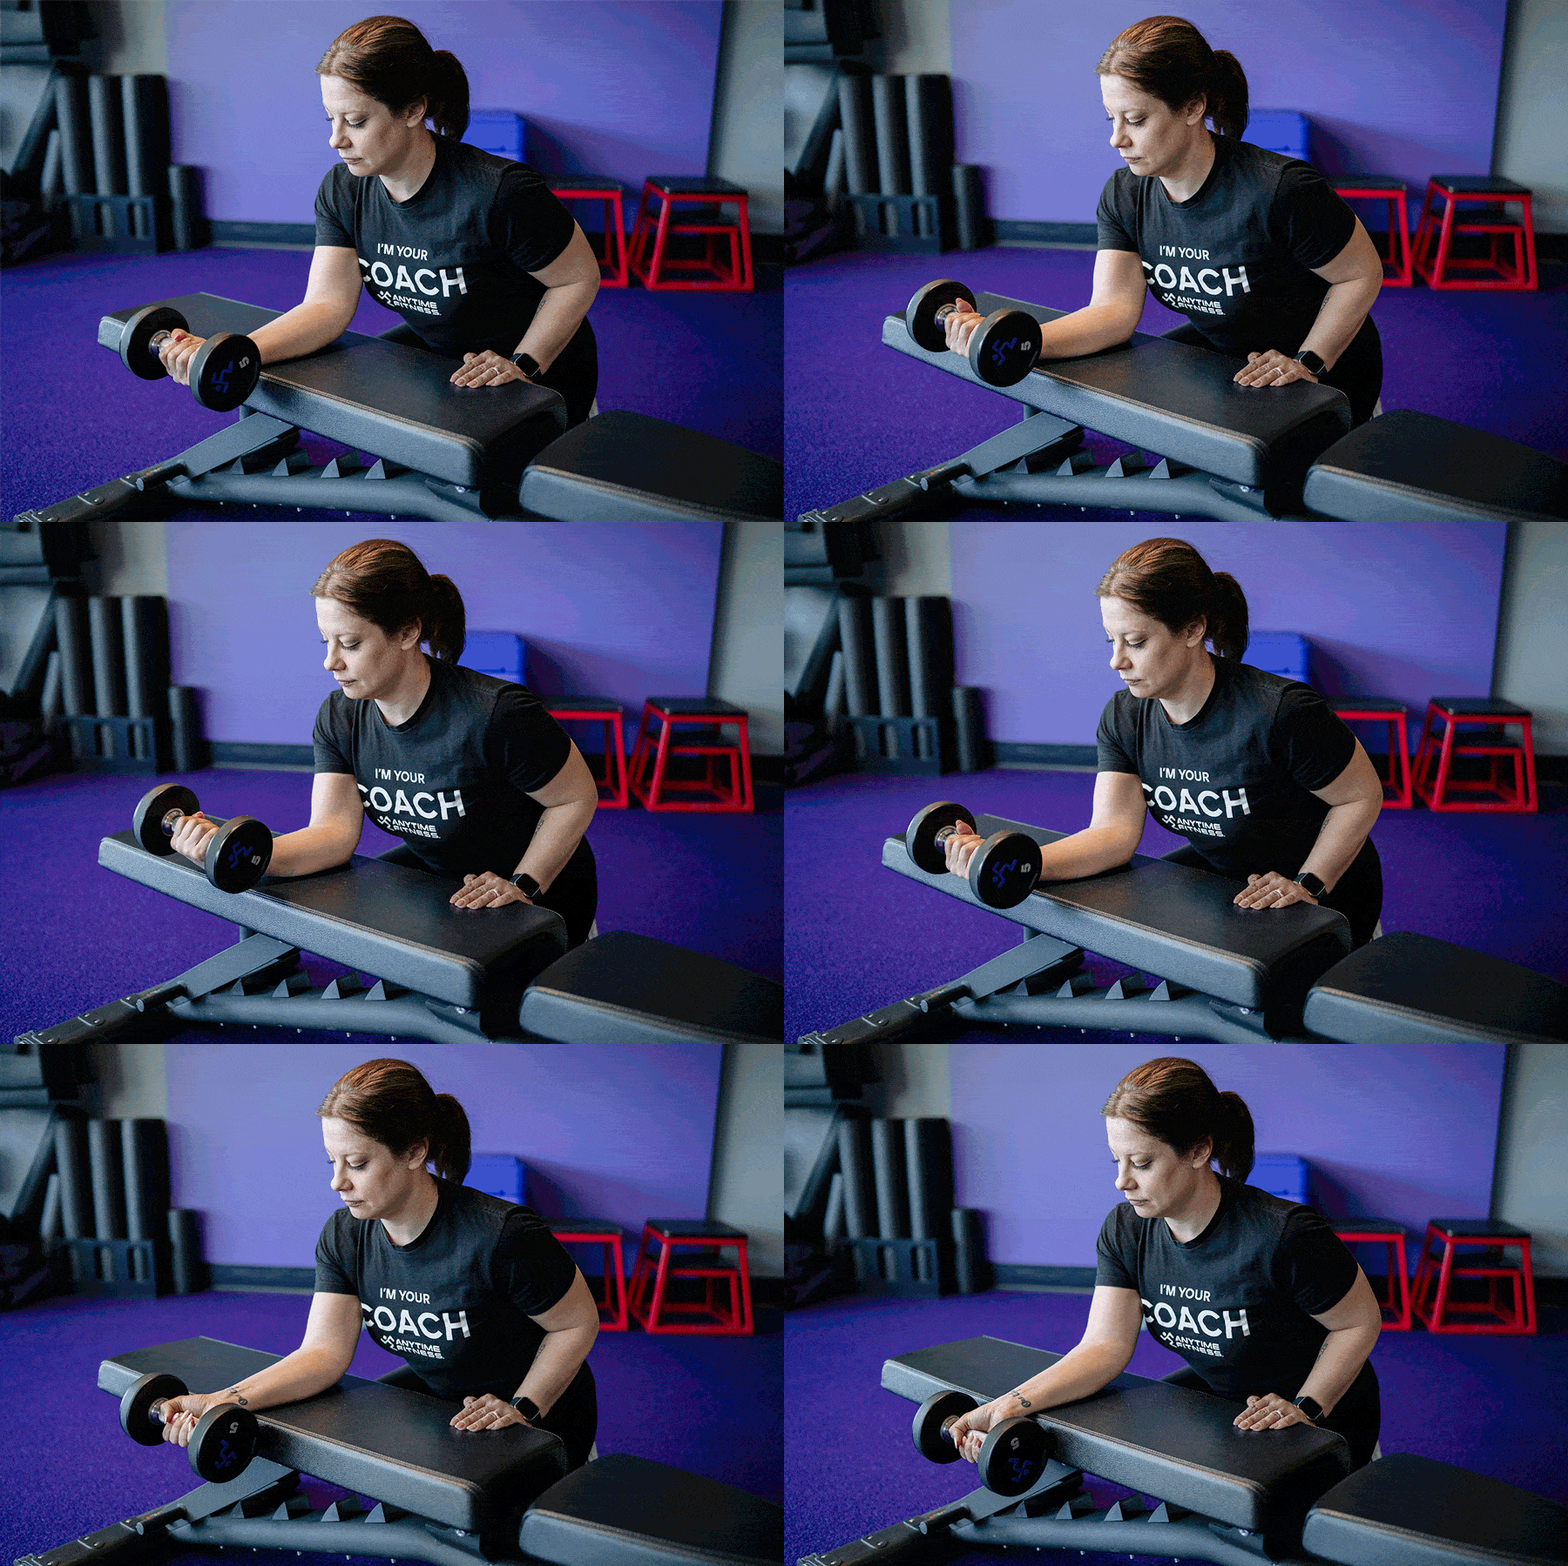
How to:
- Sit on a bench with your forearms resting comfortably on your thighs. Keep your palms facing upward and wrists hanging just past your knees.
- Hold light dumbbells with a relaxed but secure grip, allowing your wrists to extend fully downward.
- Flex your wrist upward by curling the dumbbells toward your forearms, squeezing at the top. Focus on keeping the movement isolated to the wrists without involving the elbows or shoulders.
- Control the descent by letting your wrists lower fully to a stretch before beginning the next rep.
Pro tip: You can also isolate one arm at a time by doing a single-arm wrist flexion on a bench. (This is a great option if you have uneven strength in your wrists and forearms.) Kneel with your forearm on a bench, holding a dumbbell out in front of you with the same grip. Flex at the wrist, raising the dumbbell as high as possible. Complete all reps on one side before switching to the other.
9. Seated palms-down wrist curl (wrist extension)
Type of grip: Overhand | Equipment needed: Two light dumbbells | Reps: 2-3 sets of 12-20 reps
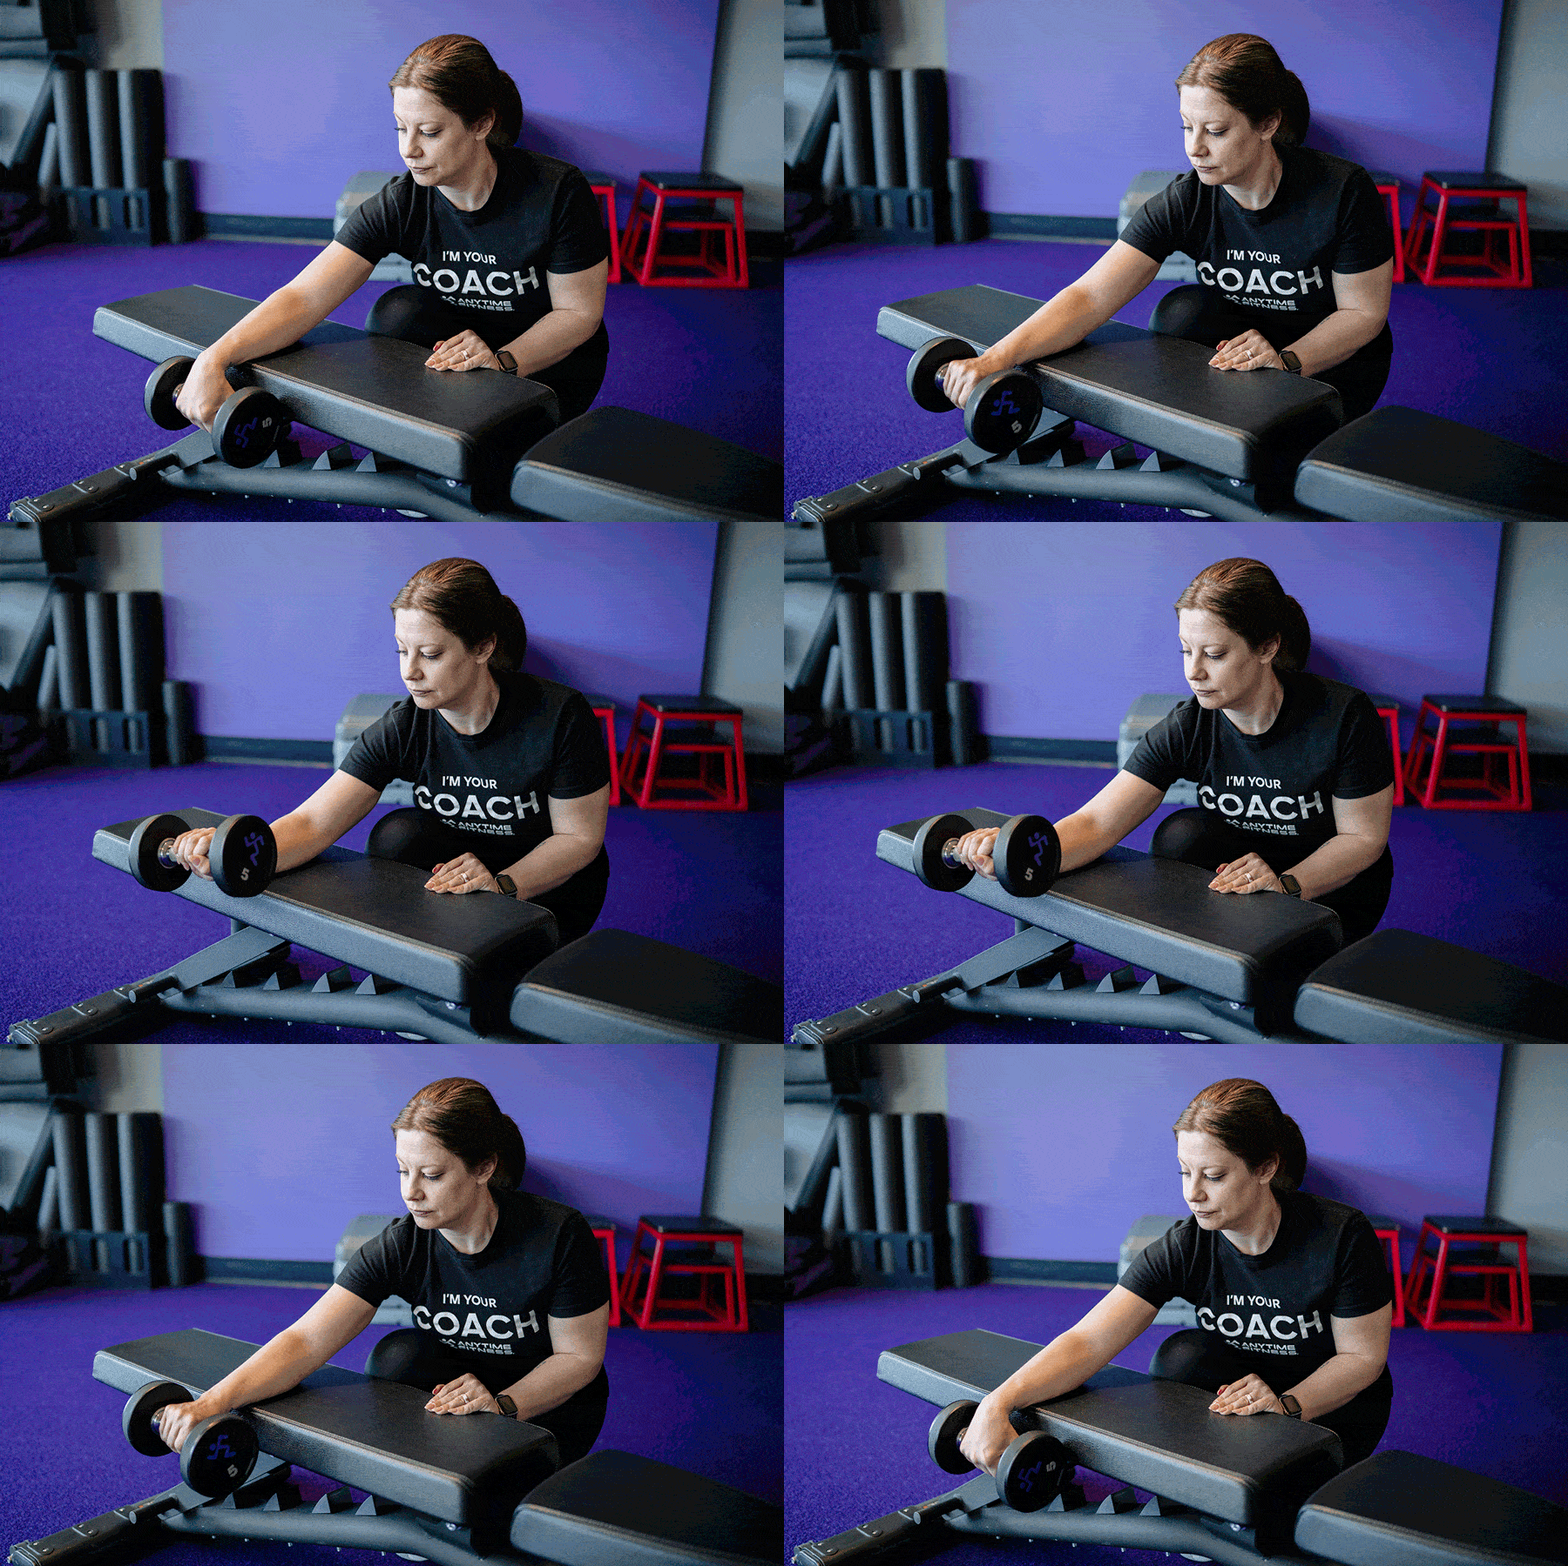
How to:
- Sit on a bench with your elbows resting on your thighs and forearms extended. Hold a dumbbell in each hand with your palms facing down.
- Flex at the wrists to lower the dumbbells toward the floor.
- Extend your wrists, raising the dumbbells as high as possible.
- Lower back to the starting position with control.
Pro tip: For extra focus, isolate one side at a time. Kneel beside a bench, resting one forearm flat on the surface. Perform the movement single-arm, switching sides after completing all reps.
10. Plate pinch carry
Type of grip: Pinching | Equipment needed: Plates | Reps: Three to four 30- to 60-second carries
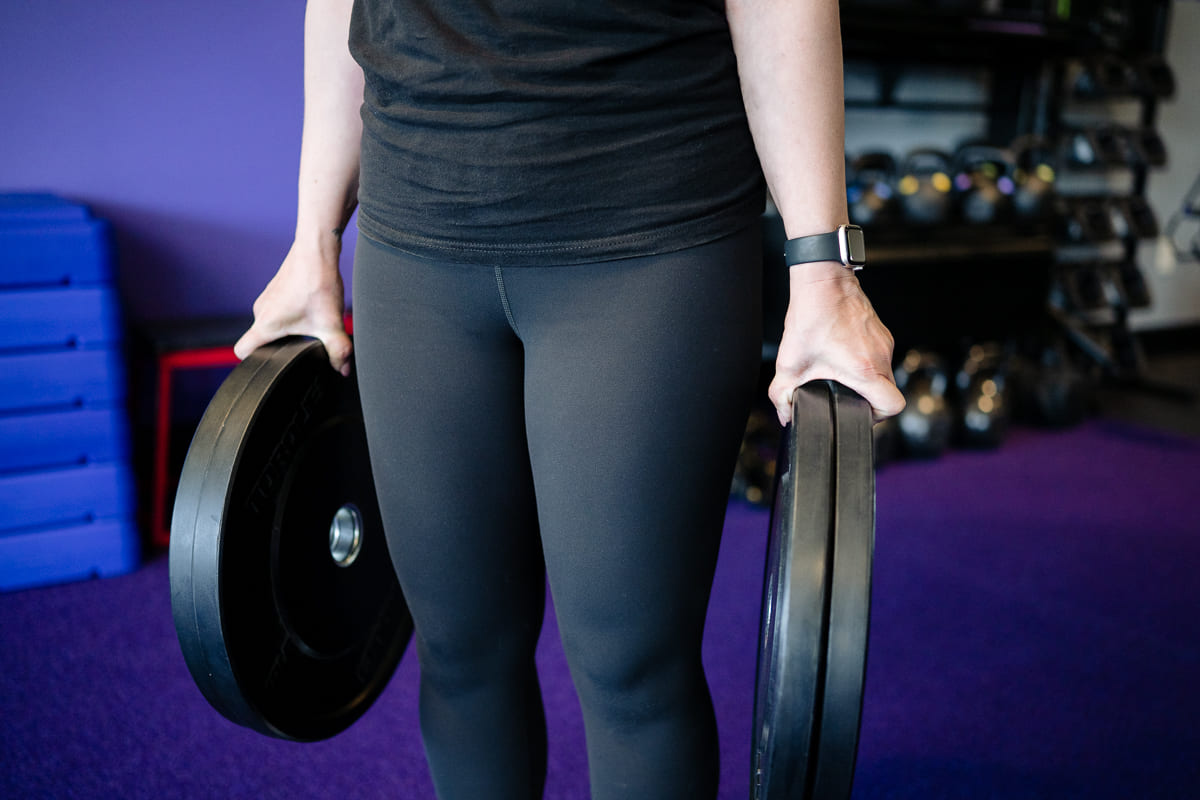
How to:
- Stand tall and grip a weight plate in each hand using only your fingers and thumbs. Do not wrap your hands around the plates.
- Set your shoulders in an active, stable position without shrugging or slouching.
- Walk forward for a set distance or time while maintaining your grip and posture.
Pro tip: Start small and build up. Choose lighter plates if needed, especially if you have smaller hands. Using two 10-pound plates pinched together is a great way to build strength and technique before progressing to heavier or thicker plates.
Bonus workout cooldown: 5 wrist and forearm mobility stretches
In addition to grip strength, mobility is another important factor when it comes to quality of life (and movement). Add these wrist and forearm stretches to the end of your workout to increase your mobility, reduce pain, and improve your ability to lift and perform everyday tasks — or do them outside the gym for a quick refresh.
Related: Mobility Stretches You Can Do in 15 Minutes to Build Longevity
Wrist flexion stretch
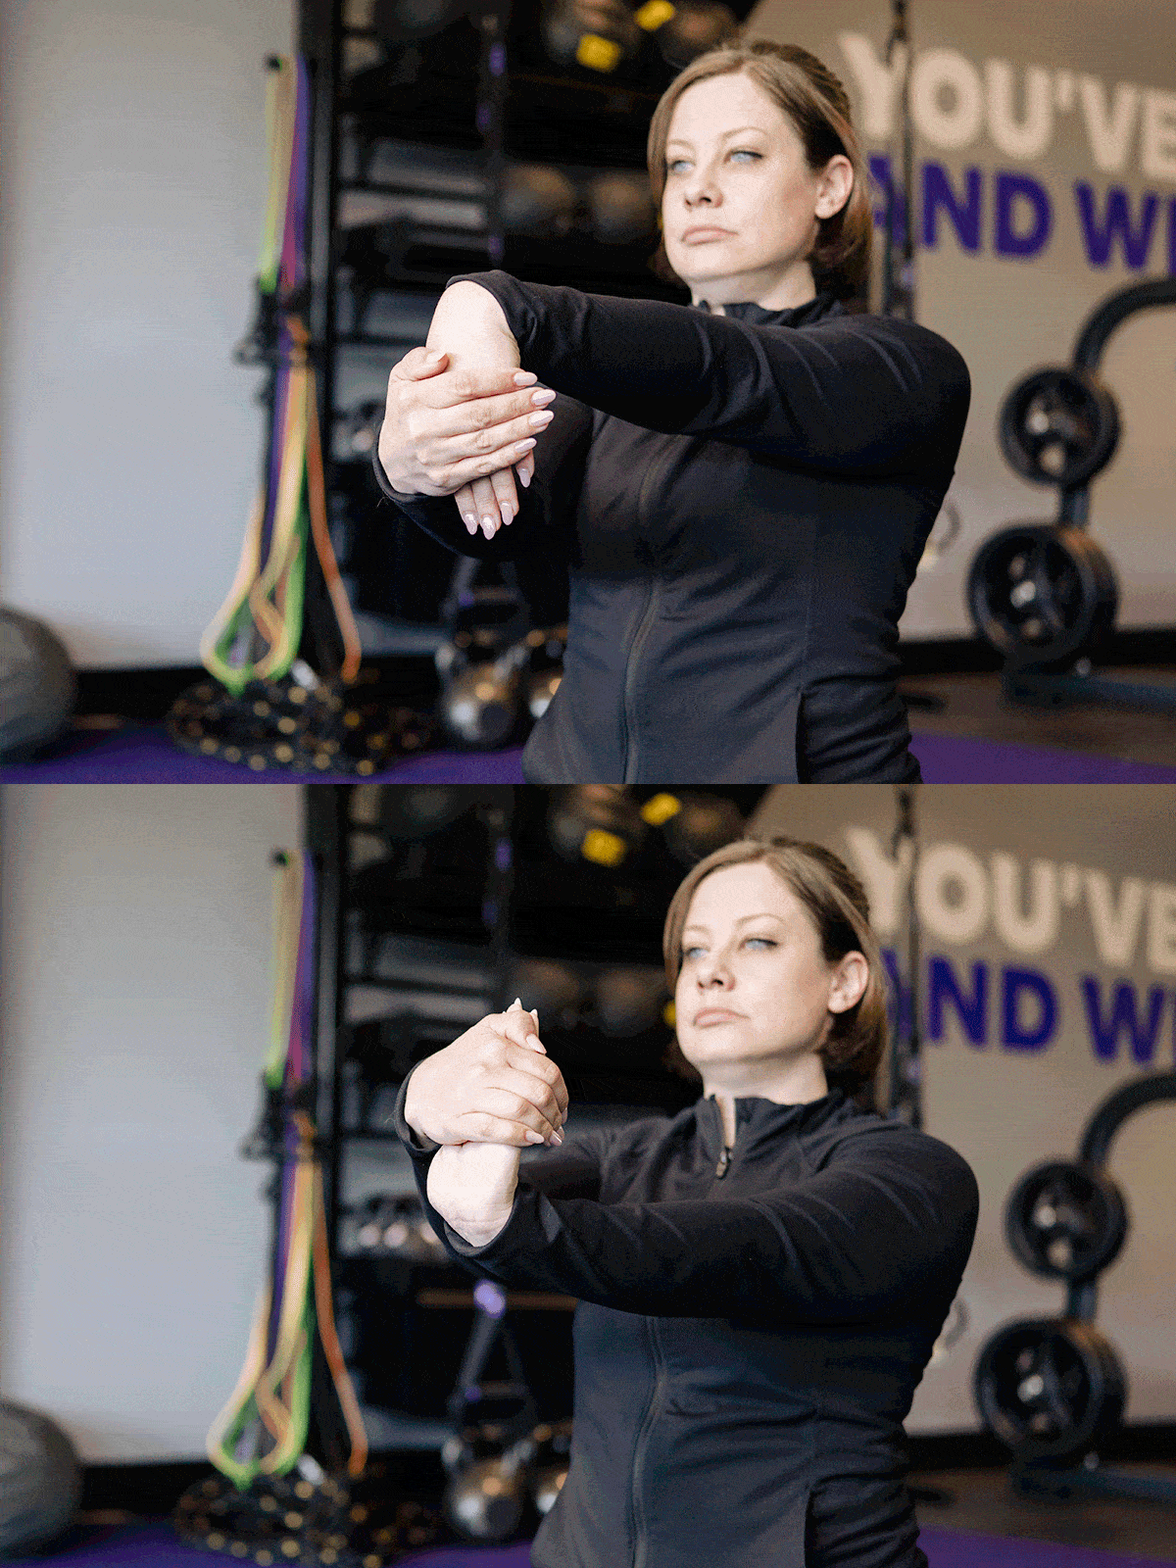
How to:
- Raise one arm straight out at shoulder height with your palm facing outward as if you were pushing against something.
- Grab your fingers with your other hand and gently pull them toward you. Hold for 30 seconds.
- Drop your wrist down with your palm facing backward. Gently pull your hand toward you and hold for 30 seconds before repeating on the other side.
Lateral wrist flexion stretch
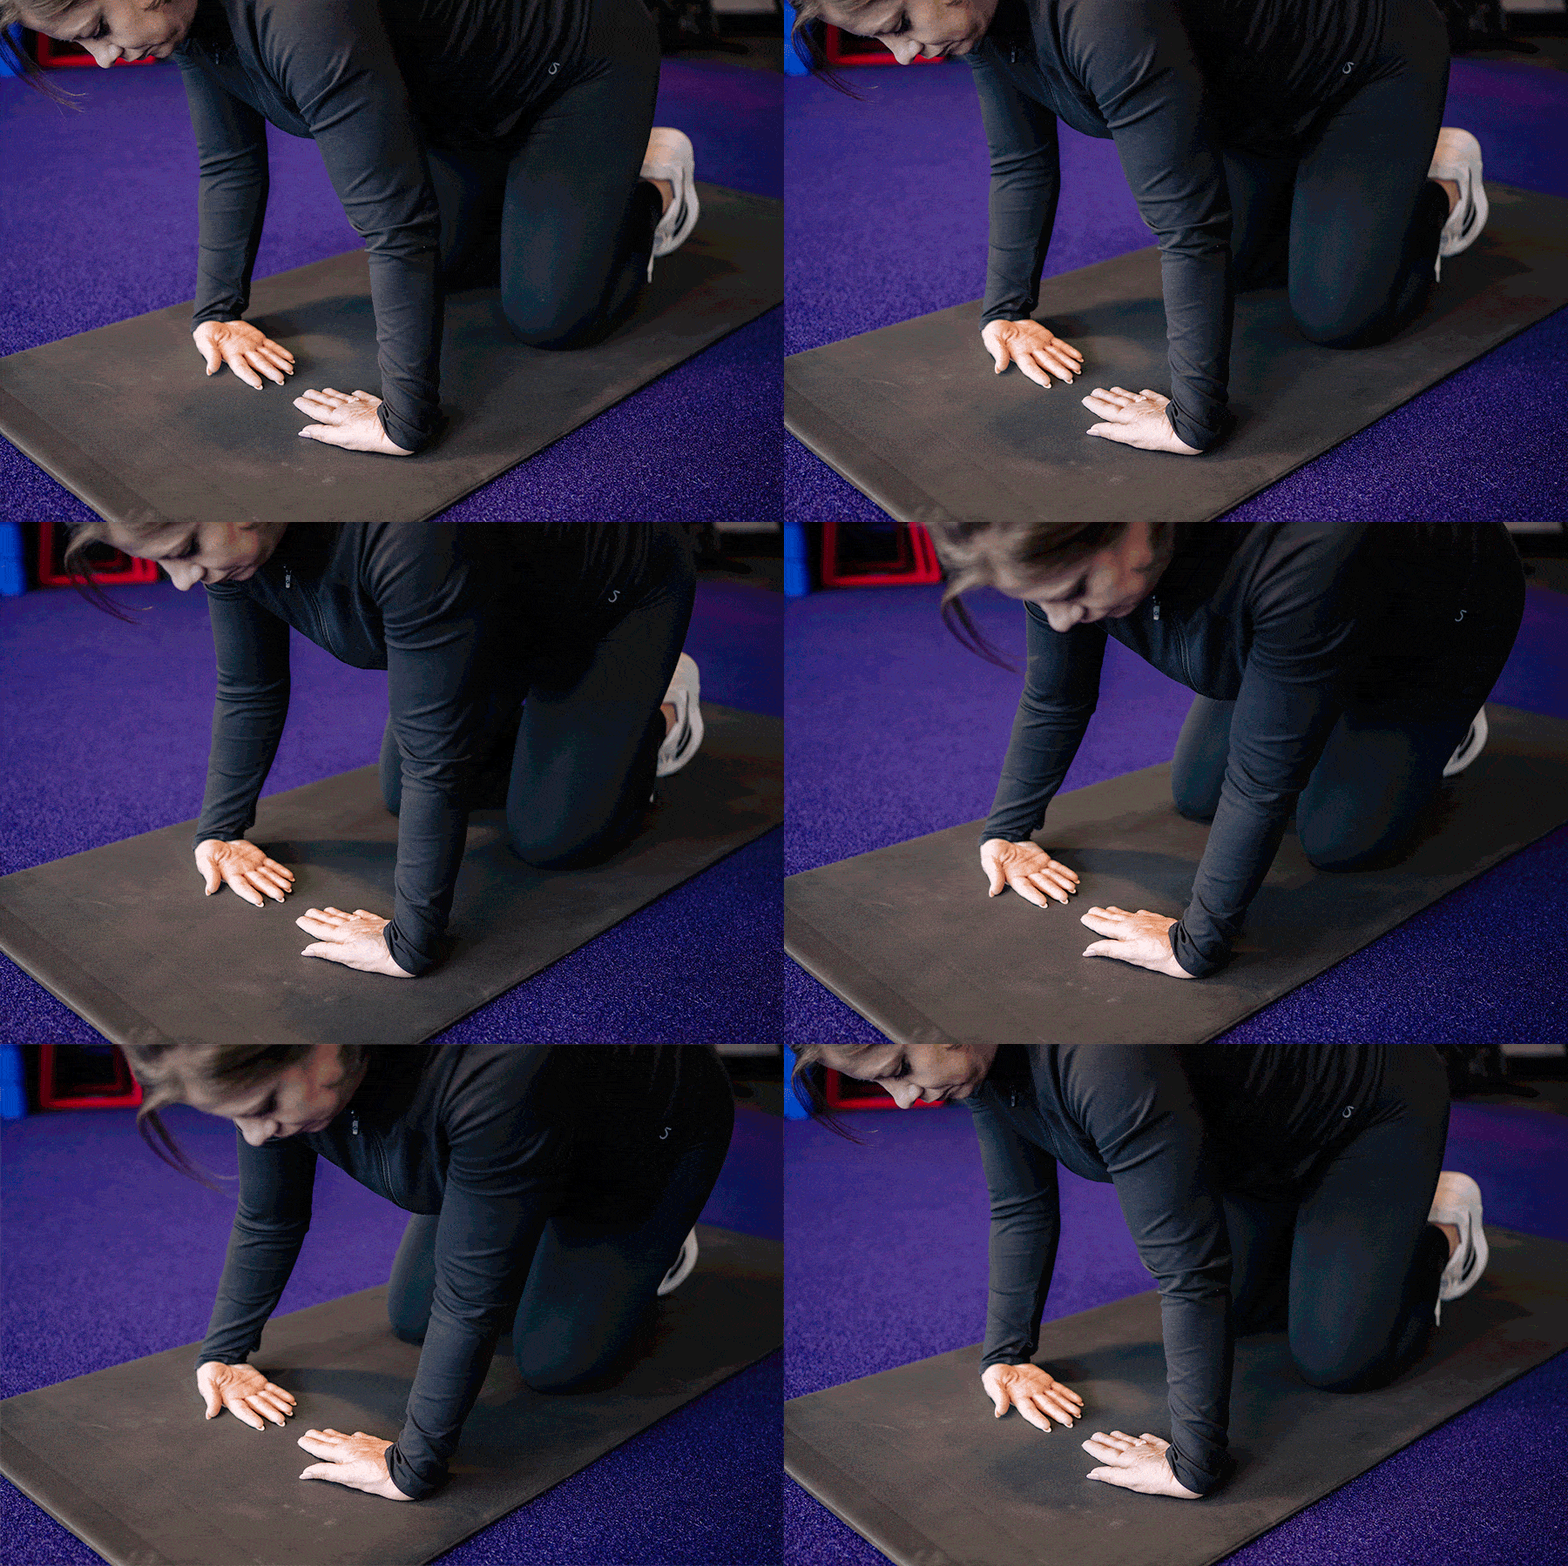
Improve grip strength
How to:
- Start in a quadruped (tabletop) position with your hand stacked under your shoulders and knees under your hips.
- Place the back of your hands on the floor with your fingers pointed toward each other.
- Gently rock left to right, creating a stretch for your wrists and forearms. Repeat for 30 to 60 seconds or 10 to 15 reps.
Wrist extension stretch
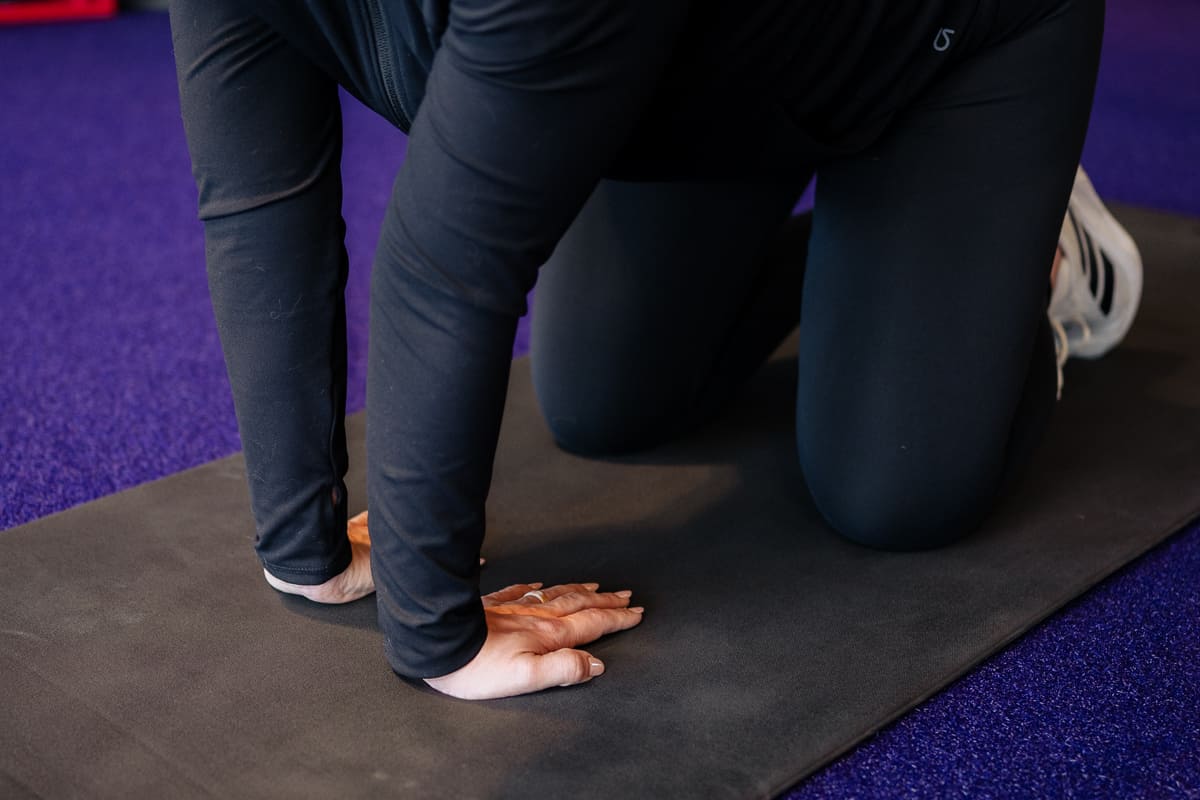
How to:
- Start in a quadruped (tabletop) position with your hand stacked under your shoulders and knees under your hips.
- Rotate your fingertips toward your knees.
- Press your palms into the floor and stretch for 30 to 60 seconds.
Side-to-side rocking wrist stretch
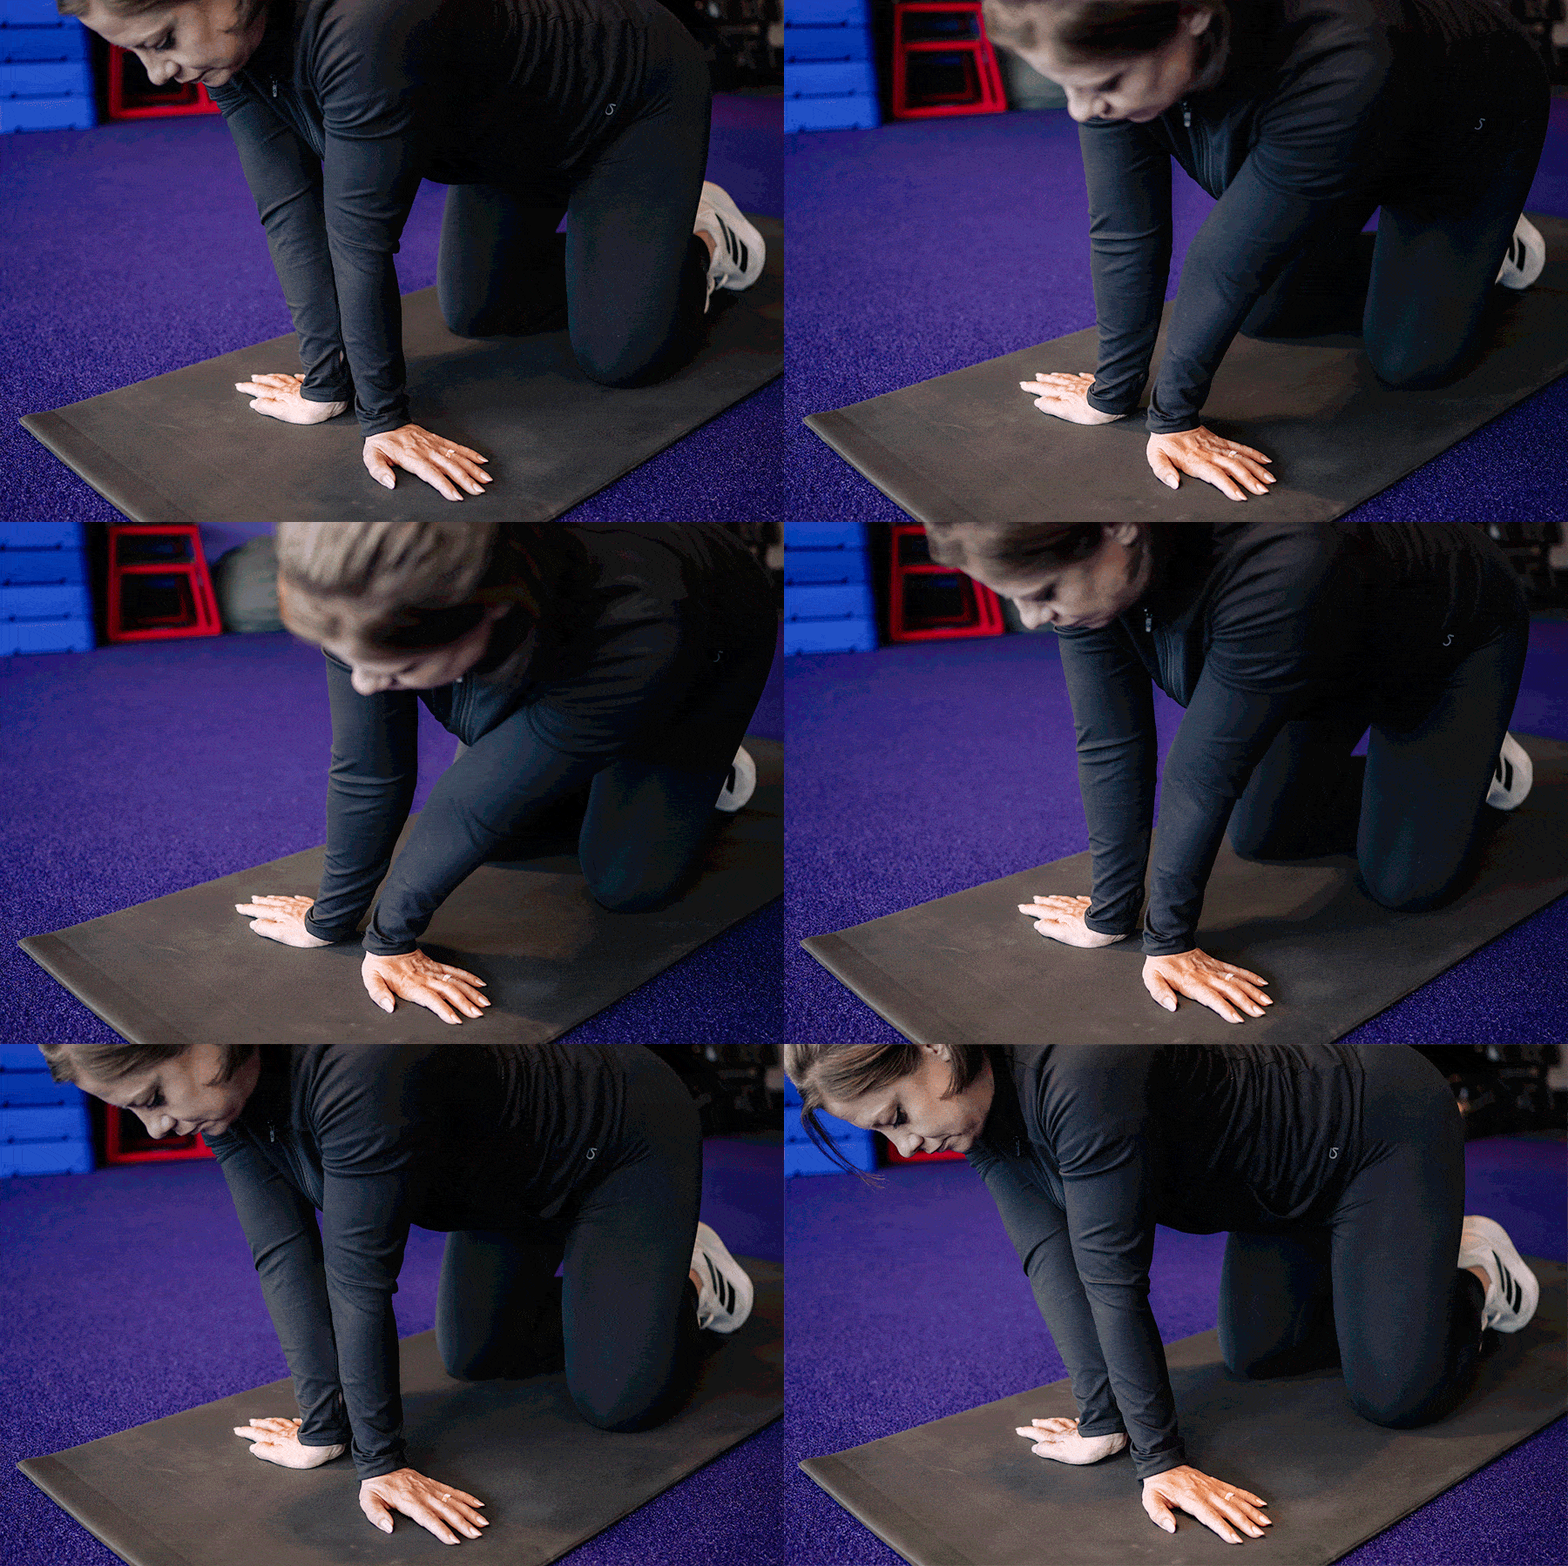
How to:
- Start in a quadruped (tabletop) position with your hand stacked under your shoulders and knees under your hips.
- Rotate your hands until your fingertips point outward.
- Gently rock left to right, creating a stretch for your wrists and forearms. Repeat for 30 to 60 seconds or 10 to 15 reps.
Wrist mobility drill
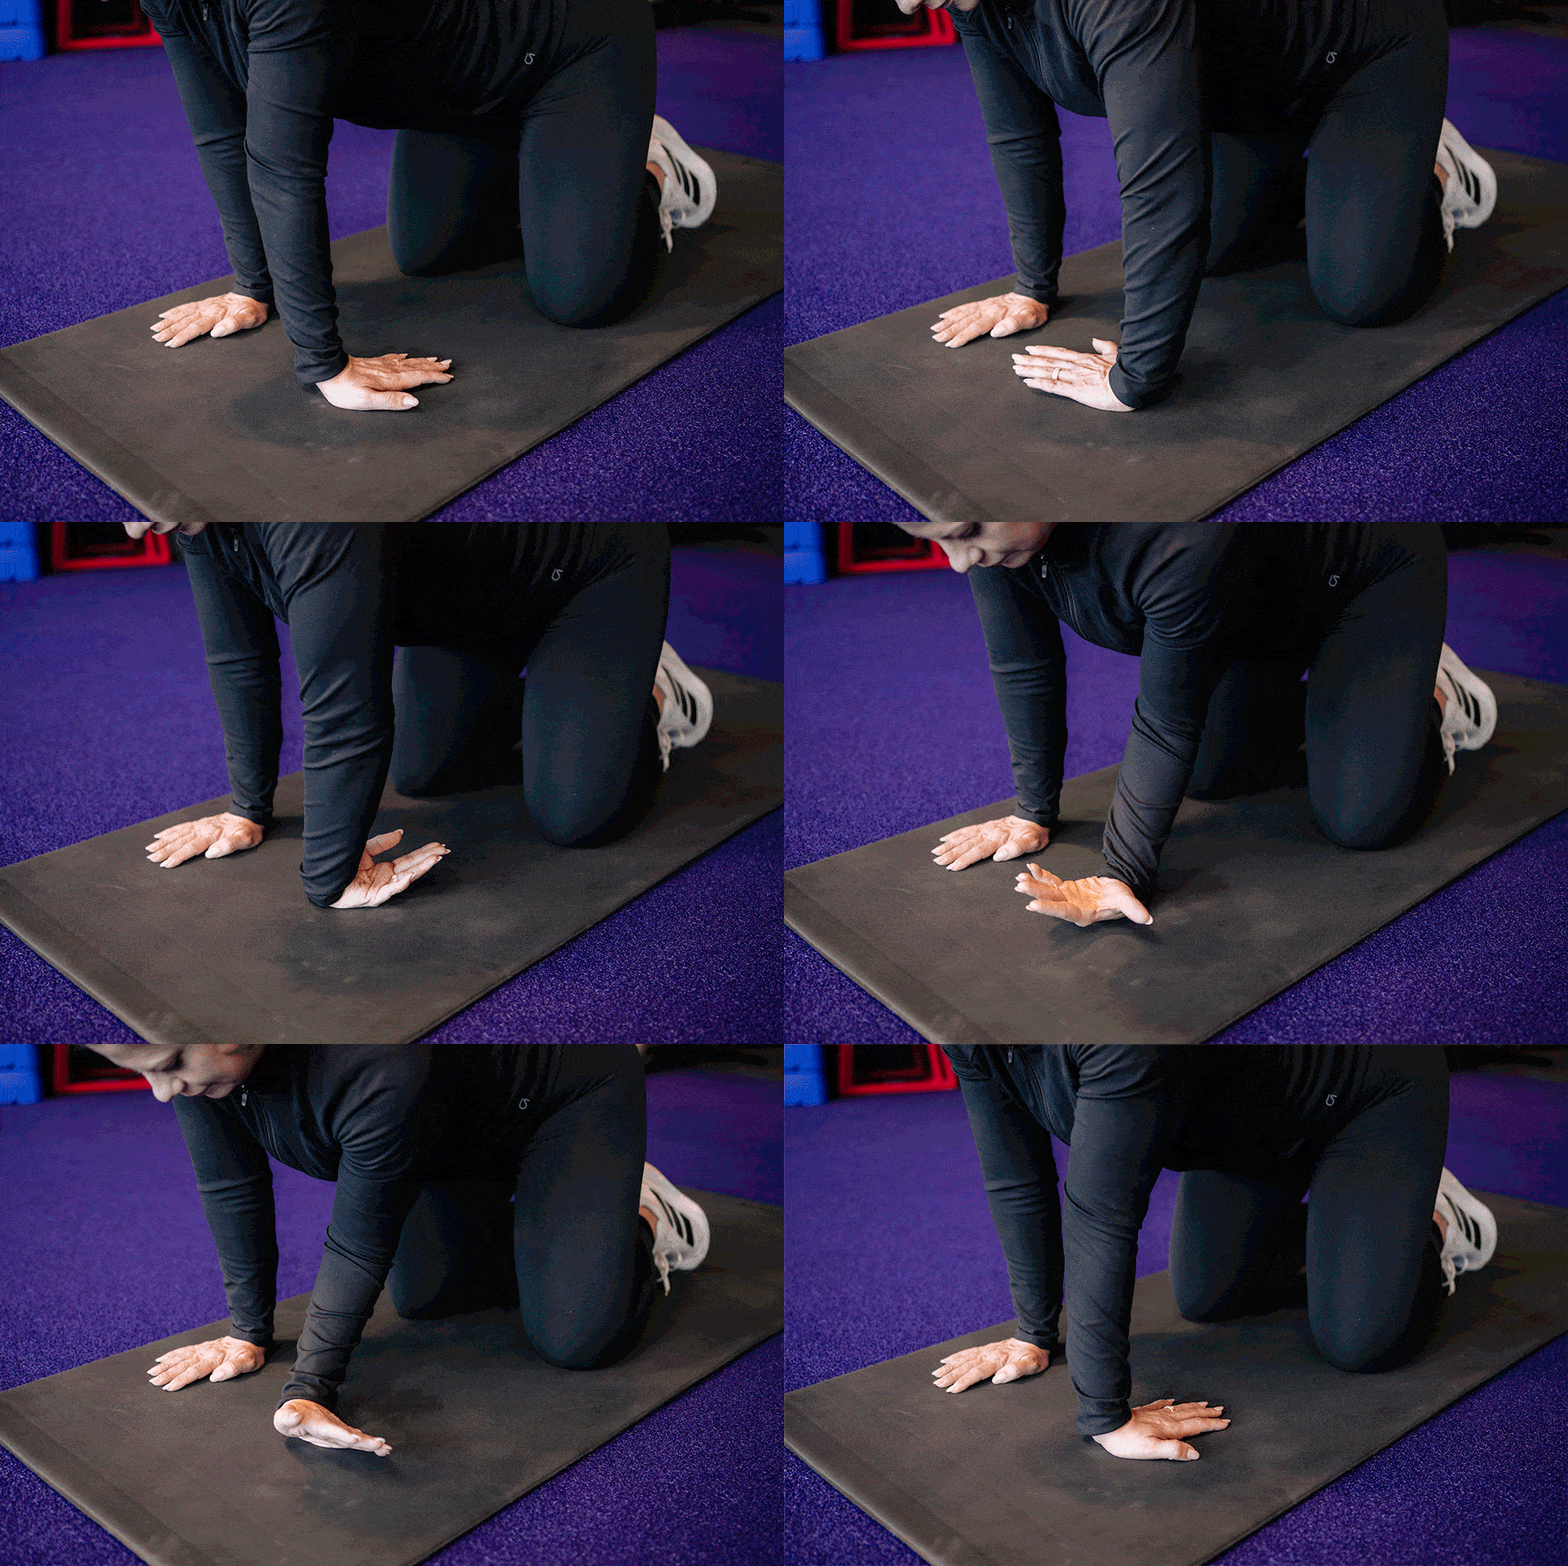
How to:
- Start in a quadruped (tabletop) position with your hand stacked under your shoulders and knees under your hips.
- Circle your hands or wrists in both directions, keeping constant contact with the floor.
- Gently move and stretch your wrists and forearms for 30 to 60 seconds or 10 to 15 reps per side.
Improve grip strength, improve overall health and longevity
No matter your fitness goals, improving your grip strength can play an important role in your wellness journey. With regular practice, you’ll feel the benefits of these exercises in just a few weeks. From improved muscle function and more effective lifts to reduced disease risk and increased longevity, learning how to improve grip strength can make a noticeable difference in your overall strength, health, and quality of life.
More strength training tips for you
- What Is Functional Training? How to Make Everyday Tasks Easier
- Making Workouts Work for You: How to Modify 3 Common Exercises
- How to Make a Workout Plan for Bigger Strength Gains
From exercises to improve grip strength to personalized recovery tips, Anytime Fitness Coaches are here for every part of your fitness journey. Get started with a free fitness consultation.
.jpeg)

%20(1)%20(1).avif)
