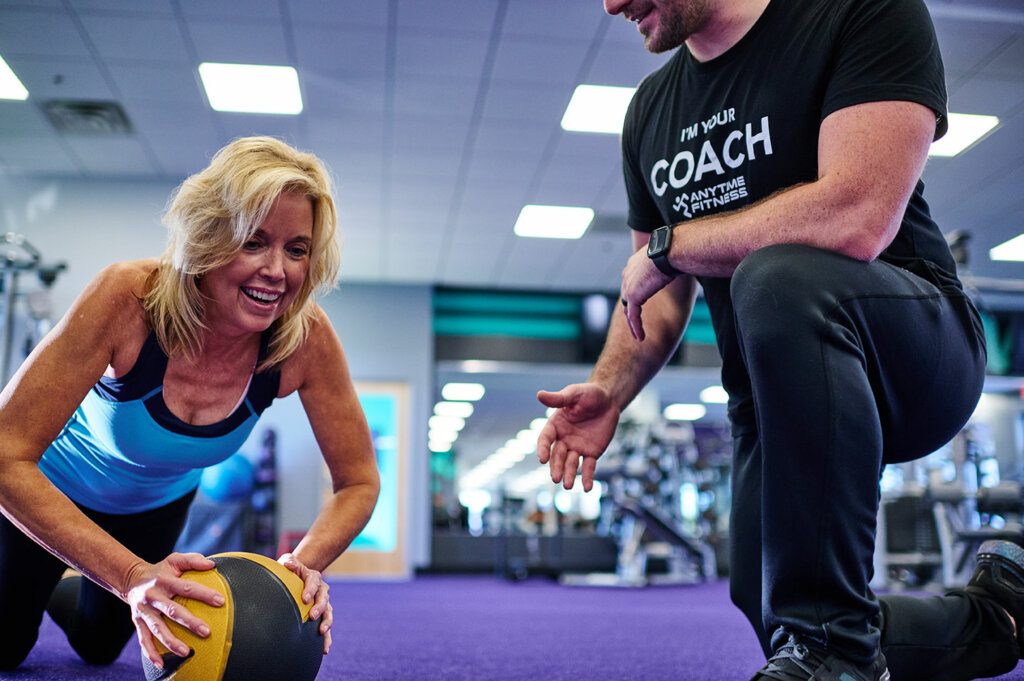
You can almost always find medicine balls at the gym, which is great news for those looking for a highly effective functional fitness workout. But before picking up a medicine ball for the first time, it’s important to get to know this versatile piece of equipment, especially the differences in size, weight, and function. Our coaches love incorporating them into the workouts they do with clients because of that versatility. Medicine balls are good for more than just explosive moves like being thrown against the wall or slammed down on the floor—though they’re plenty good for those, too! They’re also great for turning up the heat on traditional strength-training exercises while simultaneously delivering balance and endurance benefits.
What are the benefits of medicine ball exercises?
Medicine ball training will challenge your core strength and stability while working muscles throughout the entire body. The weight of the ball can be used to increase the intensity of a traditional strength exercise (like a push-up or plank). One of the coolest features about the medicine ball is that because you can grip them anywhere, you can put the ball in motion with nearly any exercise to simultaneously add weight and double as a core blasting movement (i.e., holding the ball away from your chest with straight arms and moving it right and left as you squat).
By throwing the ball—or following through and releasing it at the end of the range of motion, essentially slamming it—you’re able to develop explosive power, balance, and force. This is momentum you couldn’t achieve with dumbbells or kettlebells because they don’t have the same plane of motion. Another benefit of medicine ball exercises is that they’re perfect for all fitness levels and can be done with or without a personal trainer.
Which type of exercise ball should you use?
Lightweight or heavy? Small or large? The answers to your medicine ball questions depend on the type of exercise you’re doing. Each type is created for a specific purpose, varying in weight, size, and appearance.
Aside from the medicine ball, there are two other common types of exercise balls: Slam balls and wall balls. But before you go balls to the wall, here’s what to know about each and how to spot the difference:
Slam balls
As the heaviest of the exercise ball types, slam balls are designed for throwing or partner passing exercises, such as medicine ball slams or partner chest passes. The inside is usually sand or gel, while the outer shell is generally a thick, rubbery surface that softens the impact when slammed so that it doesn’t bounce or break open.
Wall balls
Used for gaining explosive power through throwing movements, wall balls should only be thrown at—you guessed it—the wall. The surface of these balls is typically covered in leather, with thick, double stitching on one side. They’re the largest of the three exercise ball types.
Medicine balls
There are a variety of medicine balls, but most are covered in leather, vinyl, or rubber material. Their size usually depends on weight (lightweight medicine balls will be smaller and heavier medicine balls will be larger). Most are color-coded based on weight. Medicine balls should not be slammed, as they are sometimes hollow and can bounce back or break open.
So, which weight should you use? It usually depends on the medicine ball moves and the number of reps you’re doing, but as a rule of thumb:
- Beginners should use a ball that is 2–6 pounds
- Intermediate should use one that is 6–12 pounds
- Those who are advanced can use up to 20-pound balls
Aim for picking a weight that makes the movement challenging but not impossible. It’s better to pick a lightweight medicine ball and have good form and explosive power, rather than a heavy one that slows you down and compromises form. Remember, with exercise, it’s all about quality of movement over quantity. If your weight is so heavy that you can’t perform a movement properly, switch to a lower weight. And if you’re buying a medicine ball for a home gym, note that heavier balls will have a higher price.
Now that you have an idea of what type and size ball to use, let’s get started!
10-Minute Medicine Ball Workout
This heart-pumping workout features medicine ball exercises that can challenge athletes of all skill levels, depending on the weight of your medicine ball. It’s a great way to study medicine ball movements and learn how best to work them into your routine.
The 10 medicine ball moves are:
- Russian Twist
- Medicine Ball Dead Bug
- Squat Push-Press
- Figure 8
- Medicine Ball Circle Squat
- Half Kneeling Lift (Hay Baler)
- Triceps Extension
- Lunge With Twist
- Medicine Ball Plank
- Seated Medicine Ball Trunk Rotations
Ready to give it a try? After warming up, perform each of the 10 medicine ball moves for as many reps as you can in 60 seconds. With minimal rest (15 seconds) between each move, go to the next exercise. You can repeat all of the exercises one time through for a quick 10-minute burst or repeat the circuit three times for a 30-minute full-body workout.
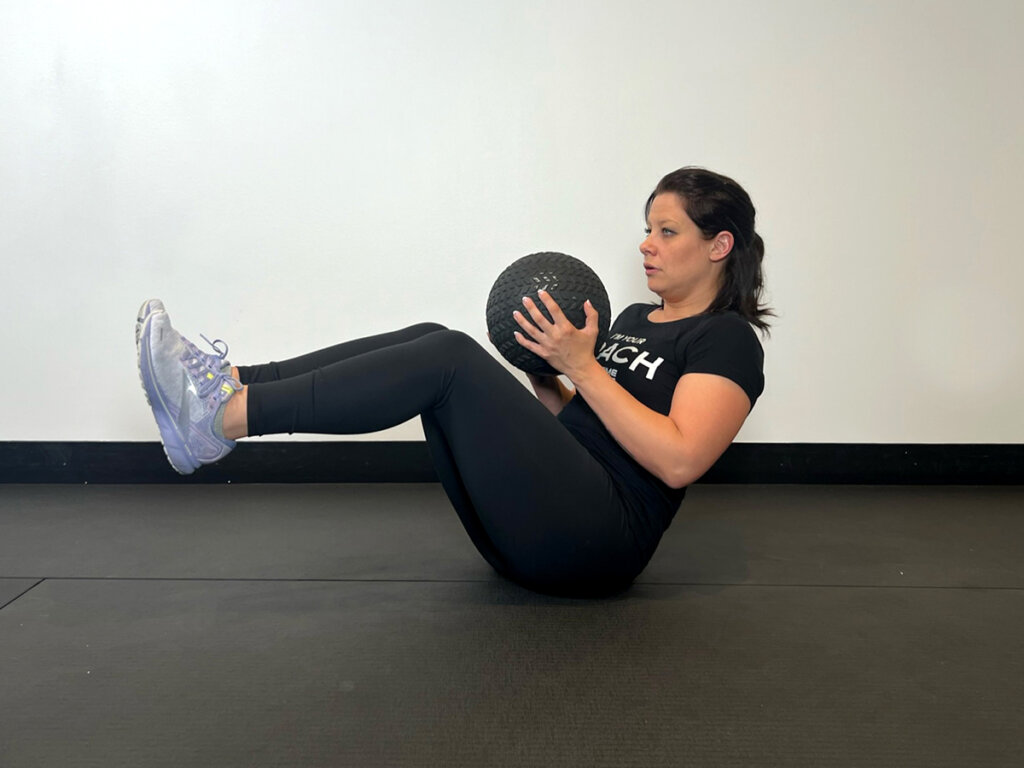
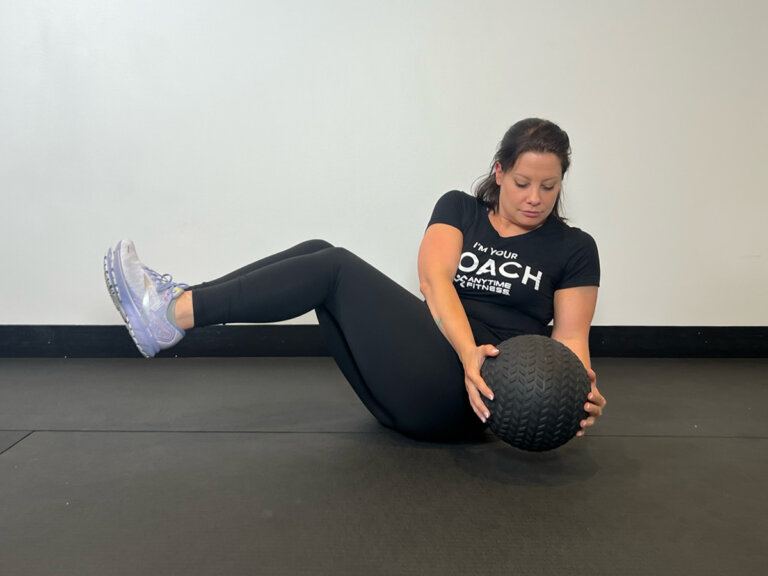
1. Russian Twist
Targets:
- Abs
- Obliques
Try it:
- Start seated with your knees bent and feet flat on the floor. Hold the medicine ball at your chest.
- Lean slightly back and lift your feet a few inches off the floor.
- Slowly twist the torso to the left and bring the medicine ball beside the left hip. For added difficulty, bounce the medicine ball on the ground while in the twist position.
- Return to center, then repeat the motion to the right.
- Repeat.
Tips:
- Keep your spine long and core pulled in throughout the exercise.
- A simpler modification is to keep your feet down on the floor.
- Engage your obliques, rather than your lower back.
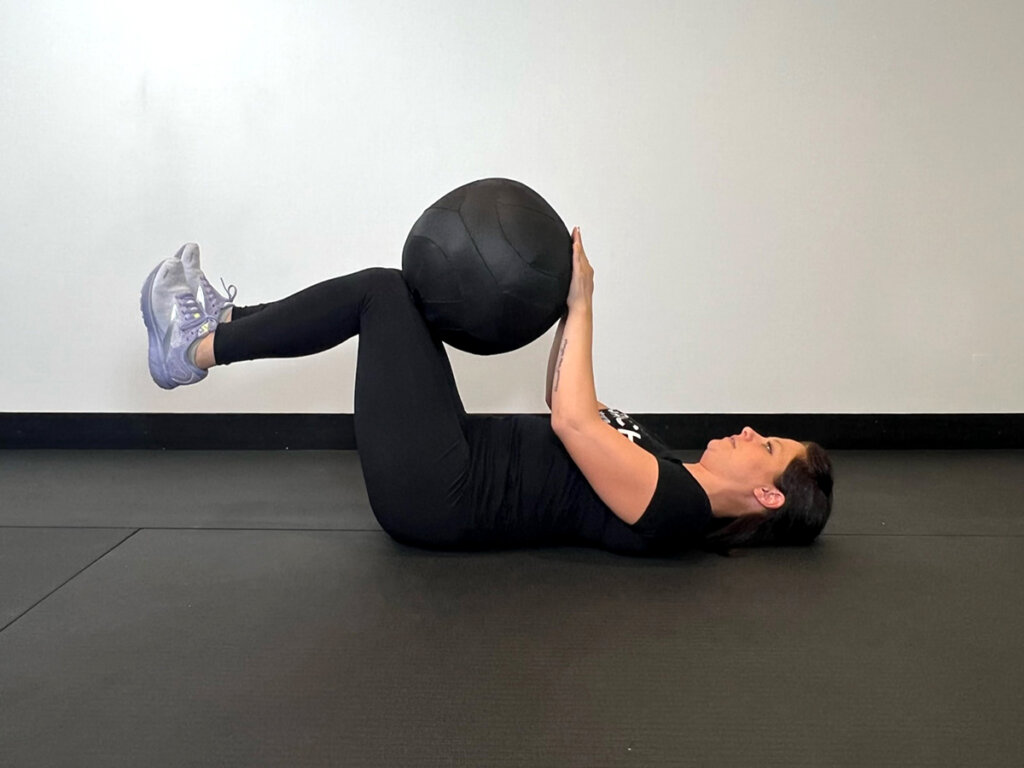
Medicine Ball Dead Bug
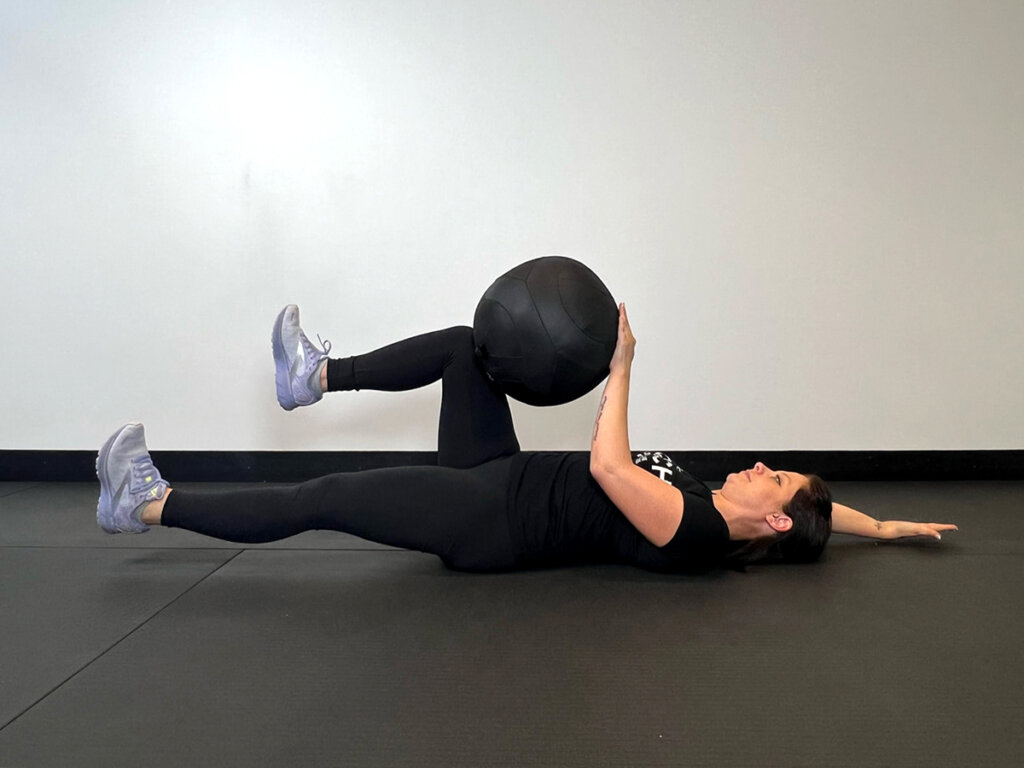
Targets:
- Abs
- Pelvic muscles
Try it:
- Lie on your back, bend your knees at 90 degrees, and hold them in the air stacked over your hips.
- Hold a medicine ball between your hands (or lower arms) and knees.
- At the same time, raise your right arm to the ground above your head and extend your left leg out. (Your left hand and right knee will continue to stabilize the medicine ball.)
Tips:
Make sure that your lower back is pressed into the floor.
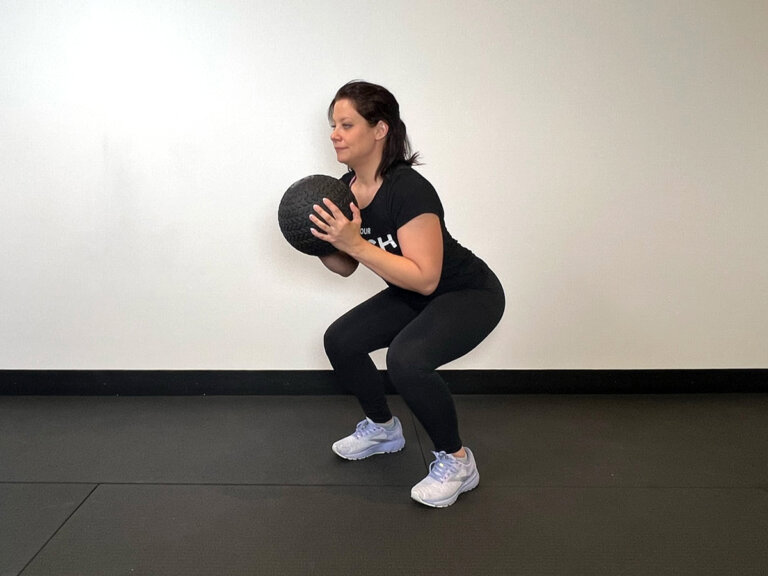
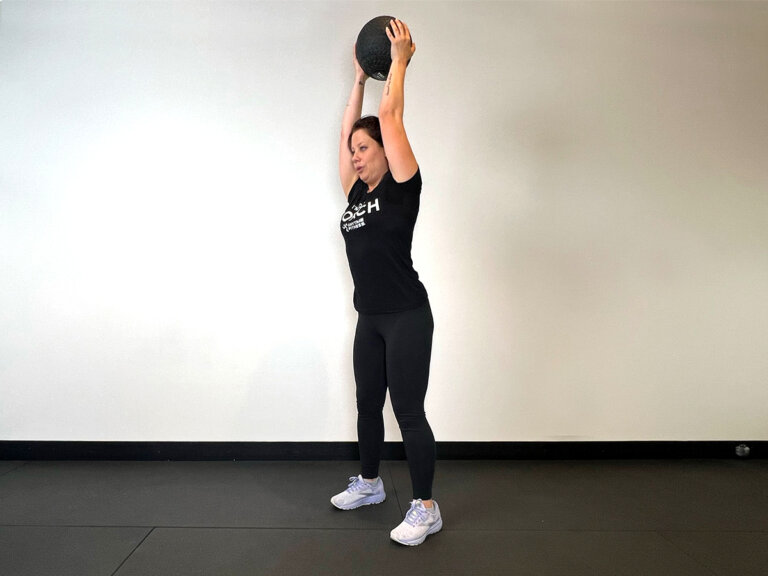
Squat Push-Press
Targets:
Try it:
- Get into starting position (similar to a squat position), with your feet shoulder-width apart, holding the ball out in front of your chest.
- Squat down, keeping the ball in front of your chest.
- As you return to standing position, press the ball overhead, finishing the move by looking up at the ball and fully extending your hips forward.
- Return to starting position and bring the ball back in front of your chest. This one will get your heart rate up quickly!
Tips:
- While in the squat position, be sure to keep your feet hip-width apart with your body’s weight in the heels.
- Keep your elbows soft when extending the ball overhead—don’t lock them in place.
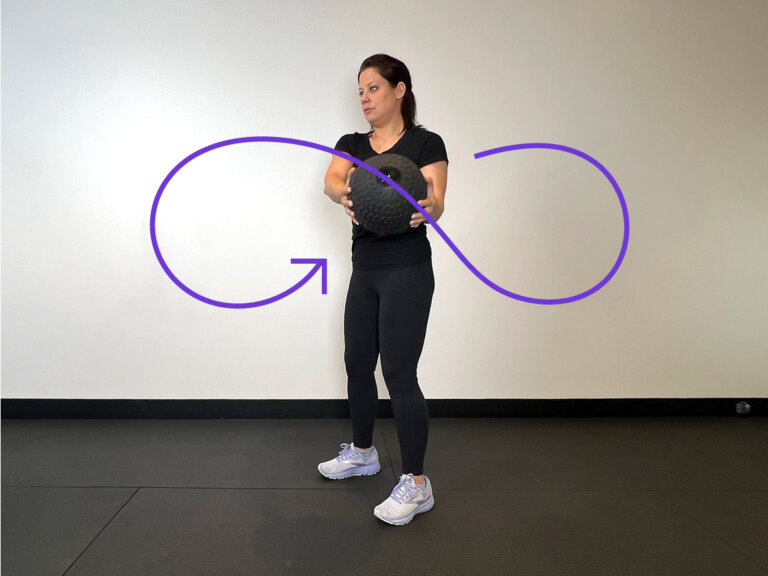
Figure 8
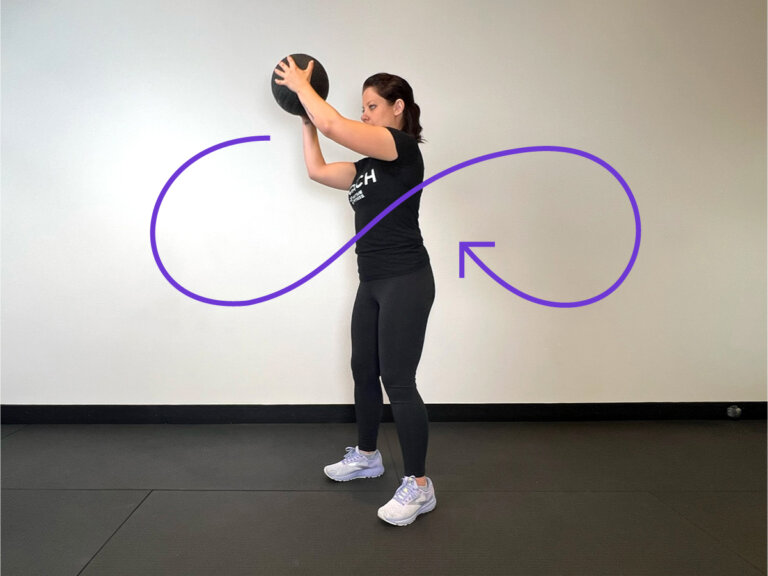
Targets:
- Arms
- Shoulders
- Obliques
Try it:
- Bring your feet shoulder-width apart. (For more of a challenge, put your feet hip-width apart.)
- Hold the ball out in front of you, with one hand on each side of the ball.
- Tighten your abs to keep your shoulders back and your upper body upright as you draw an imaginary figure 8 in the air in front of you. (Note: The 8 will be sideways and look like an infinity sign.)
- After 30 seconds, go in the opposite direction. Remember that you’re aiming for strength and precision rather than speed.
Tips:
- The closer together your feet are, the tougher the core challenge. Start with your feet shoulder-width apart, then move them in if you want to increase the burn.
- For even more of a challenge, try this on one leg to work on your balance.
- Don’t let the ball drop below your belly button.
Medicine Ball Circle Squat
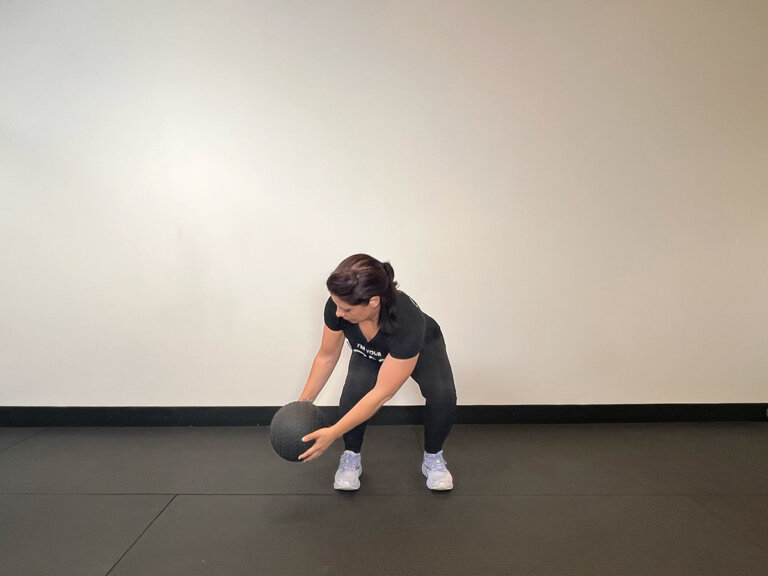
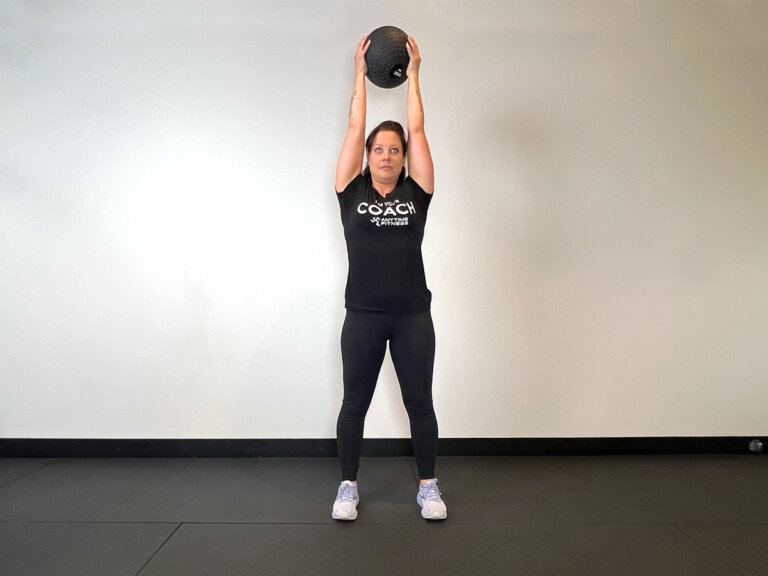
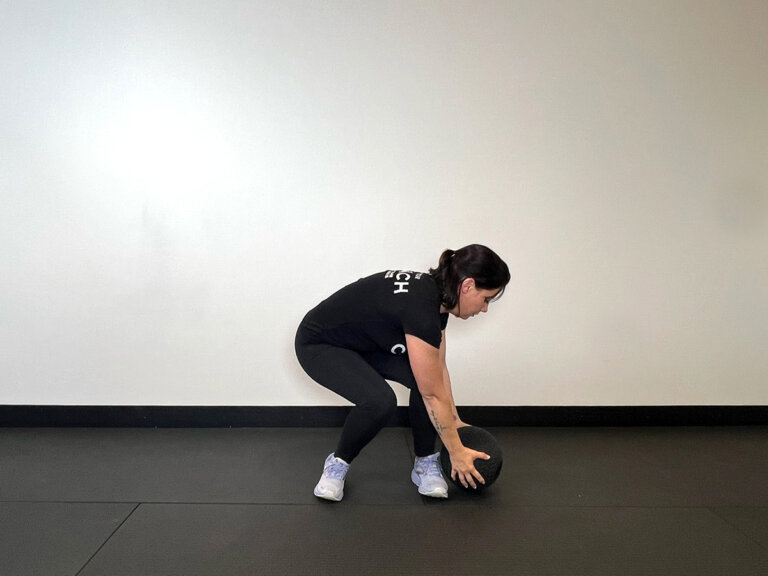
Targets:
- Arms
- Shoulders
- Obliques
Try it:
- Start with your feet shoulder-width apart. Get into a squat position, and squat down while holding the ball on the outside of your right foot.
- As you stand up, keep the ball on the right side of your body, bringing the ball overhead.
- Without pausing at the top, squat down and lower the ball from your left shoulder, down your body, to your left foot. You should have just created a smooth, rainbow-shaped arch.
- Squat back up bringing the ball back over your left shoulder, overhead, and to the right.
Tips:
- Be sure to keep weight in the heels during the squat
- As best you can, keep your knees forward as you move the ball toward the floor.
- Touching the floor is not mandatory, so reach as far toward the ground as possible.
- Lengthen the spine as you reach for the ground; avoid rounding the back.
Half Kneeling Lift (Hay Baler)
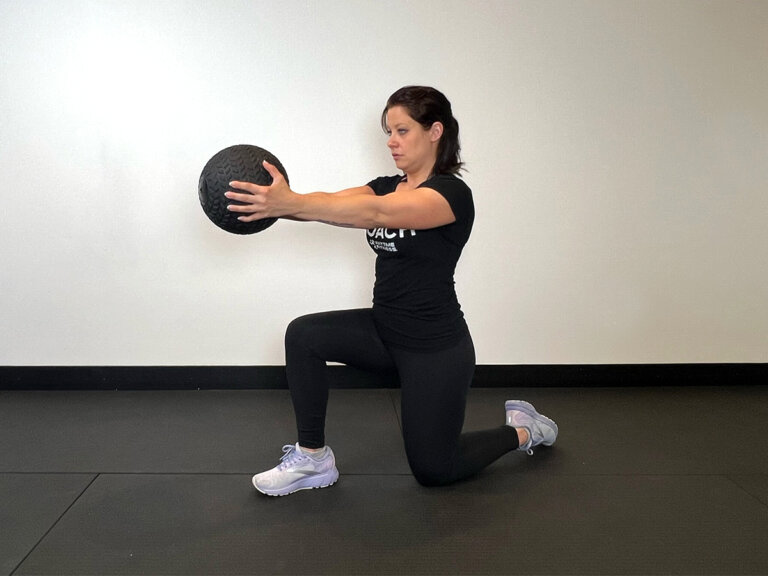
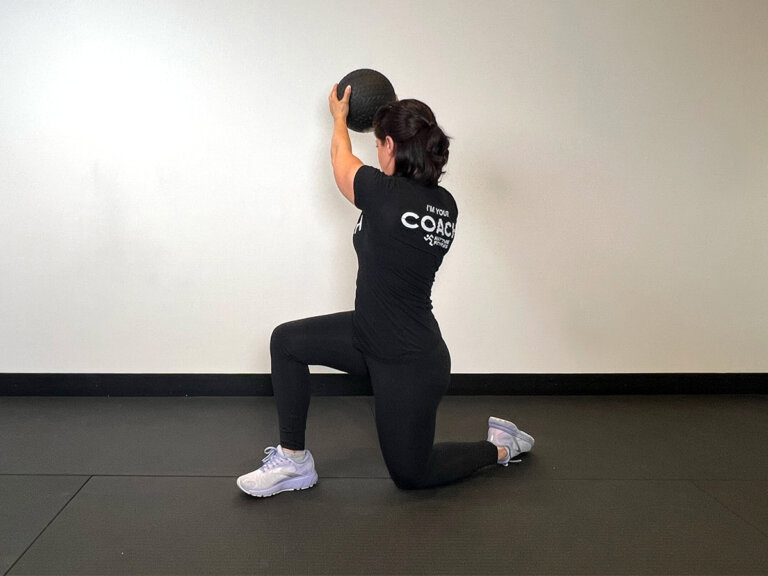
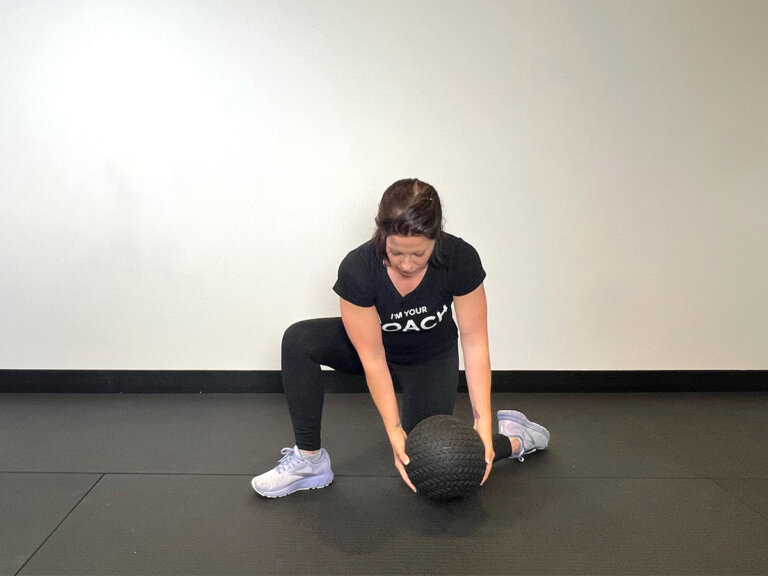
Targets:
- Arms
- Shoulders
- Obliques
Try it:
- Get into a lunge position but rest your left knee on the ground and lay your left foot toes-down on the ground (your right knee should be at a 90-degree angle with your right foot flat on the floor).
- Hold the ball with both arms extended straight at the hip of your left leg.
- Twist and bring the ball out and across your body to your right shoulder; this should make a straight line diagonally from your left knee to the space in front of your right shoulder. Bring the ball back down to your left leg.
- Repeat for 30 seconds, then switch sides so that your right knee is down on the ground for the remaining reps.
Tips:
- Keep in mind that the more the arms are extended, the harder the move.
- You may want to use a workout mat to make this more comfortable.
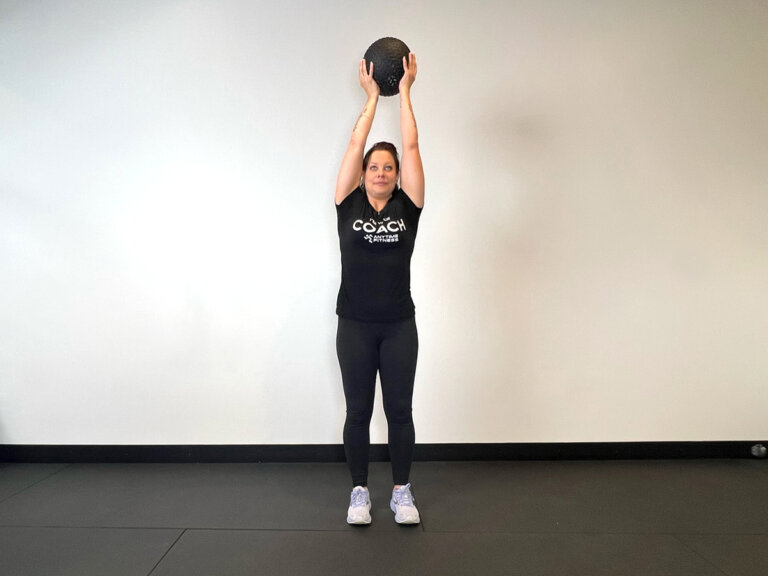
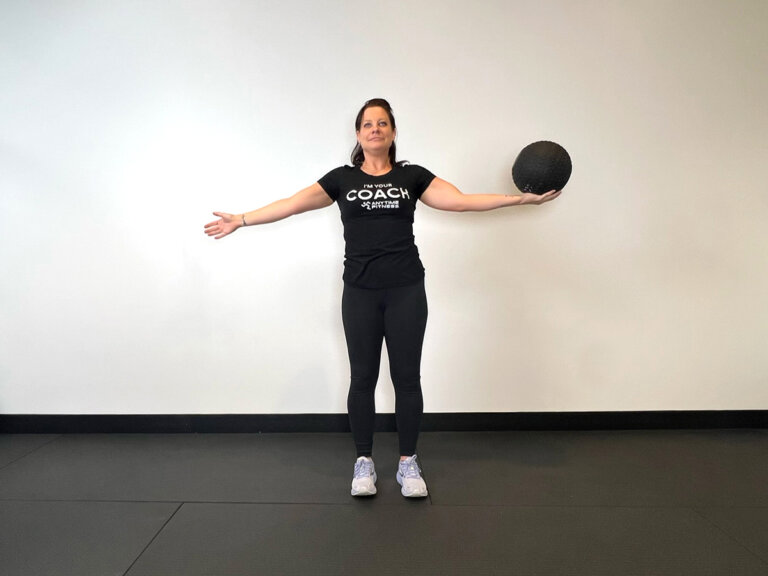
Triceps Extension
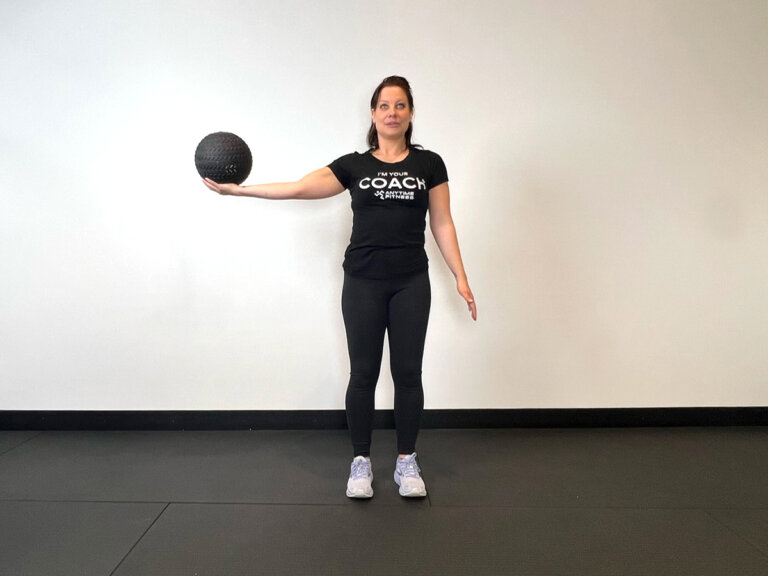
Targets:
Try it:
- Stand, or sit, with your feet hip-width apart. Hold the medicine ball out to the side in your right hand.
- Raise your right hand and arm overhead, as you transfer the ball to your left hand.
- Slowly lower your left hand and arm down to your side, just opposite of starting position.
- Repeat by raising your left hand back up to meet your right hand overhead.
Tips:
You could also perform the move seated on a chair or a stability ball.
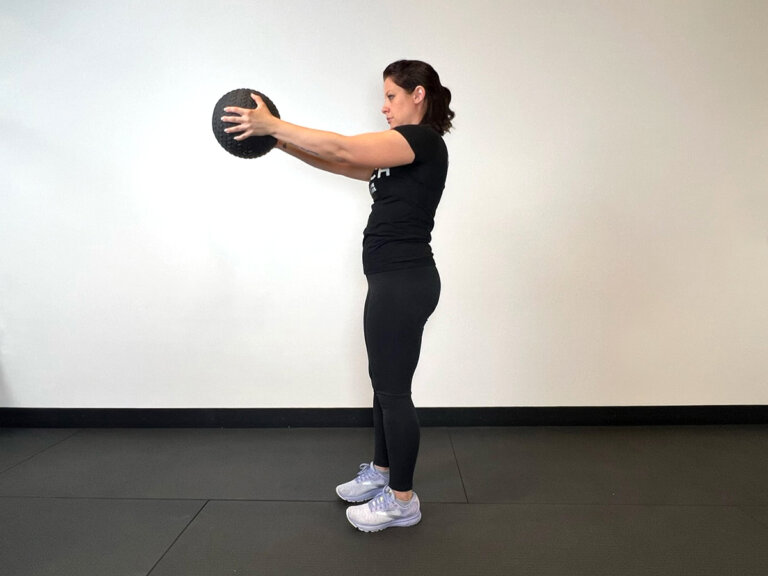
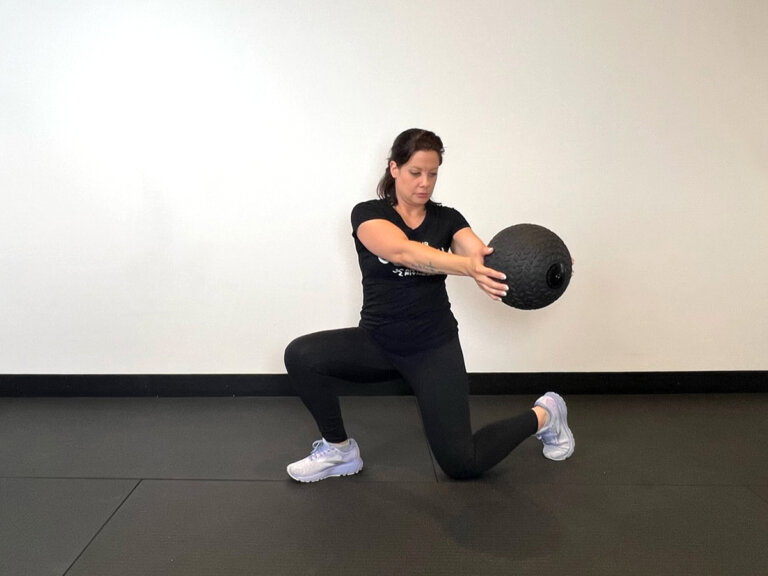
Lunge with Twist
Targets:
- Lower half of the body (legs, quads, glutes, hips)
- Core
- Obliques
Try it:
- Bring your feet hip-width apart and hold the ball out in front of you.
- Step into a lunge with your right leg and twist the ball to the left. Return the ball to the center and step back to starting position.
- Next, switch sides by stepping your left leg forward and twisting to the right. You should aim to get equal reps on both legs.
Tips:
- You can also perform the twist with walking lunges. In the lunge, be sure to keep weight in the heel of the front foot to protect the knee.
- Keep in mind, the longer your arms reach, the tougher the move.
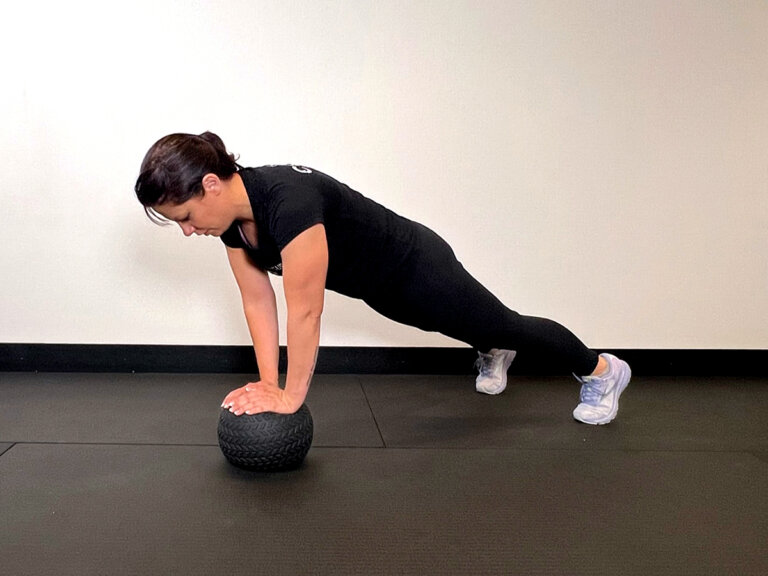
Medicine Ball Plank
Targets:
- Core
- Lower back
- Obliques
Try it:
- Put both hands on the medicine ball, so that the inside of your wrists are nearly touching, fingers are facing away from each other. The ball should be aligned directly under your shoulder blades. You’re going to be in a high plank position, with your hands on a medicine ball instead of the floor, so you might want to use an exercise mat for your feet.
- Reach back your right leg, followed by your left leg, and step up onto your toes. Your legs should be completely straight, along with your entire body. You can have feet hip-width or even feet shoulder-width apart for stability, or closer together for more of a challenge.
- For this exercise, there is no such thing as “reps.” If you can, try to hold a plank position for the entire 60 seconds; otherwise, hold it for any many seconds as you can.
- If you’re looking for an extra challenge, try dropping down to a push-up position, then pushing yourself back up!
Tips:
- This medicine ball move can be performed with feet together, feet wide for a bit more stability, or on your knees on a mat.
- If you find it uncomfortable to have your hands so close together (especially in the shoulders), don’t force it.
- You can use a larger/heavier medicine ball for this exercise, since you won’t be picking it up and you’ll need space for your hands.
- If you’ve been looking to add intensity to your planks, this is a great move to get your heart rate going.
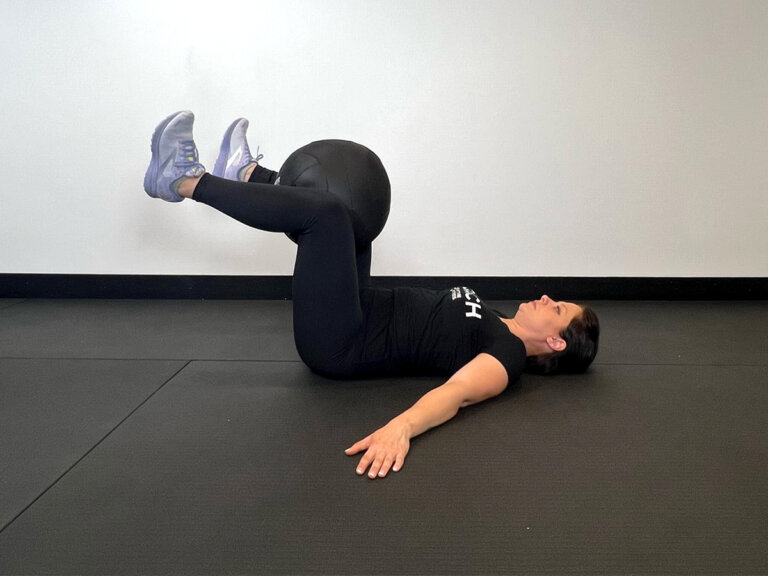
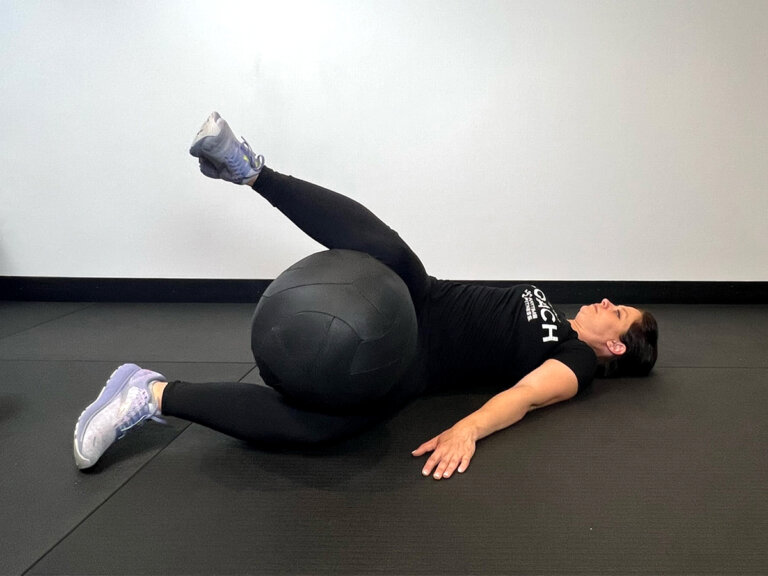
Medicine Ball Trunk Rotations
Targets:
- Core
- Obliques
Try it:
- Start by lying on the floor or on a mat with your legs up, knees at a 90-degree angle. Put the medicine ball between your knees and squeeze your legs together to hold the ball in place.
- Keeping your upper back on the ground, slowly rotate your torso to the left to lower your legs to the floor, squeezing the ball between your knees the whole time.
- Twist your torso to bring the legs and medicine ball back across your body and to the right.
- Repeat.
Tips:
- Keep both arms outstretched on the floor to help steady your body.
- For a more difficult variation, don’t let your legs touch the ground.
Bonus medicine ball exercises: Slam balls and wall balls
Feel like getting a little more explosive? These slam and wall ball exercises will up the ante.
Medicine Ball Slams
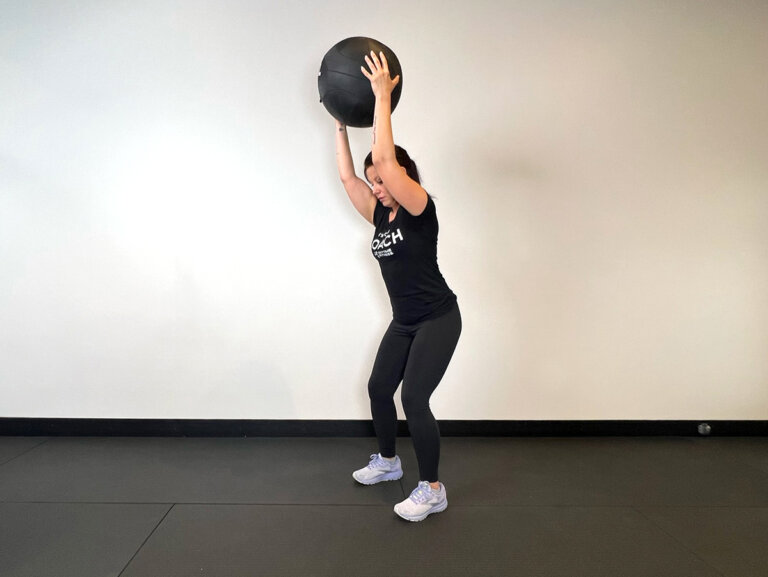
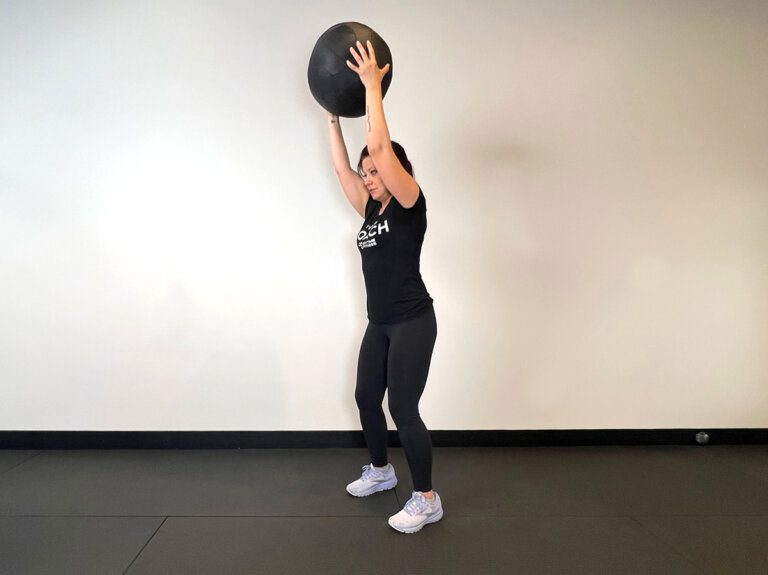
- Stand with feet shoulder-width apart. Keep your knees and hips slightly bent. Hold the ball at your torso.
- Squat down slightly, then in one powerful motion, press through your heels and rise to the balls of your feet. Swing your arms and lift the medicine ball overhead.
- Slam the medicine ball down between your feet as hard as you can.
- Pick the ball up from the floor and move right away into the next slam.
- Repeat.
Wall Ball Squats
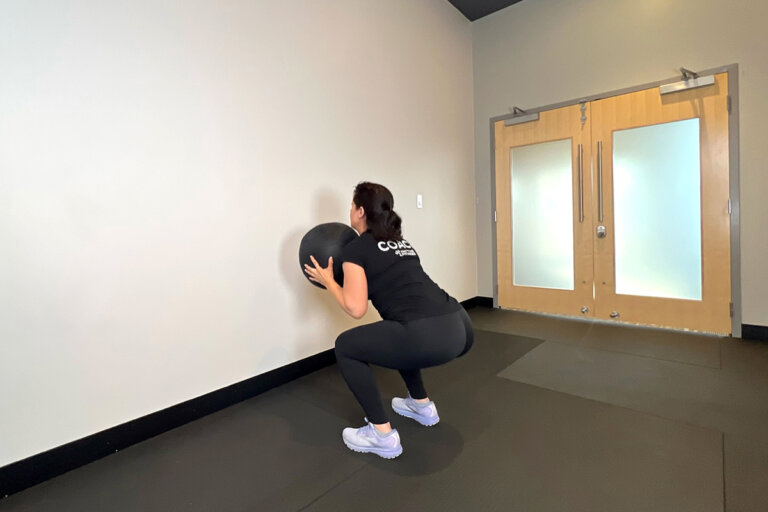
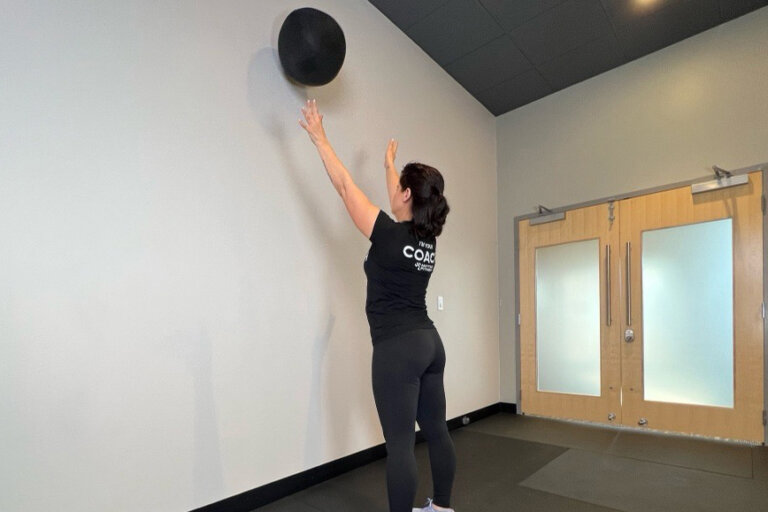
- Stand about two feet in front of a wall with your feet hip-width apart. Keep your toes slightly outward.
- Hold the ball at chest height and keep your elbows tucked in.
- Squeeze the ball hard while moving down into a squat until your thighs are parallel to the floor.
- Drive your body up while tossing the ball about eight feet up the wall.
- Keep your arms extended and catch the ball after it bounces.
- Repeat.
Starting a new fitness routine can be rewarding—and challenging. For more exercise ideas to keep you inspired, check out our library of workout ideas.
