
We’re letting you in on one of our favorite fitness secrets. There’s a small, portable piece of training equipment that serves two purposes: It can help you add resistance to your workout and aid in your recovery after. There aren’t many weights or machines that can make the same twofold claim.
Resistance bands have always been a sleeper piece of gym equipment, quietly tucked away on hooks just waiting to make your muscles hurt (in a good way). Not only are they an important tool for any gym floor, they’re inexpensive and portable. You can pack your resistance band and tote it around with you everywhere you go so you never need to skip a training workout.
While these bands might look like oversized rubber bands built to help you stretch your little heart out—and hey, that’s what they were originally used for—they’re actually a powerful tool you can use to build a killer strength workout that’s mobile, effective, and challenging regardless of athletic ability or experience. We built an incredible resistance band workout that will help you safely build strength without any heavy lifting.
What's the deal with resistance bands?
Resistance bands have gone through many iterations since they were originally developed. Invented by Gustav Gosswiler in 1895, these bands were first used in rehabilitation training in the early 20th century. Decades later, trainers used them for recovery and rehabilitation, but after performing studies on their effectiveness for building strength, specialists agreed bands had the same impact as traditional weights. Today they’ve become interchangeable with barbells and dumbbells. In fact, resistance bands have even been proven to help prevent disease. They’re accessible to anyone—regardless of age or ability. Resistance bands are even considered a viable option for those who suffer from frailty.
Today resistance bands aren’t just used to mend bodies as a low-impact tool to help absolve injury or pain, they’re now thought of as an important piece of gym equipment that help build muscle mass and stamina. You can use them to add resistance to your squats, bicep curls, or lunges—all without lifting a weighted barbell or heavy plate.
Over a hundred years after they were first brought to market, resistance bands are widely thought of as an integral part of any good workout. And there’s not just one kind anymore. Resistance bands go by many names—such as therapy band, fit loop band, and a figure-8 band—and they range in width, from as narrow as a finger to wider than a smartphone.
No matter where you are in your fitness journey, resistance bands are an accessible and affordable way to elevate your fitness.
One fitness tool, endless uses
This simple piece of equipment is so mighty we built an entire workout around it. But don’t think it’s the only way you can weave a resistance band into your routine. Once you’ve mastered this workout, try this routine from coach Rachel, or this 30-minute workout to shake up your resistance band workouts.
Resistance bands have other health benefits in addition to building strength and muscle tone and we’ve highlighted some of our favorites below. Incorporating a band into your workout will give you well-rounded training.
Increased stability and balance. In order to keep the correct form, and keep the band in-line during resistance band workouts, you’ll be forced to activate your “stabilizer muscles.” Even though you only meant to target one muscle group—like your upper back—you’re actually getting an entire body workout because you need to engage your core and lower body to keep balanced. Score!
Improved mobility. Resistance or loop bands aren’t just for building muscle, they’re also for improving your flexibility and joint mobility.
Reduced risk of injury. Resistance band workouts are typically filled with low-impact strength training exercises that you’re able to do alone without a personal trainer or coach. It can be tempting to believe that the only way to build muscle is by lifting heavy weights, but that’s typically when injuries happen. Plus, the best resistance band exercises are also used in rehabilitating injured muscles and joints—no wonder they’re also called “therapy bands.”
New spin on favorite exercises. Variety is the spice of life and it’s no different for your workout routine. If your go-to exercises have been feeling a little stale lately, try mixing it up by performing them with a mini band or loop band. Not only will it feel different, it will also change the way your body has to work, too!
Which resistance band is right for you?
Before you start our resistance band workout it’s important to select a band that’s right for you. The way most resistance band exercises work is by building tension using the resistance. This tension wires in the “resistance” that will challenge your muscles and push you outside your comfort zone. There are a lot of different kinds of bands to choose from depending on what you are looking to get out of your workout. Follow our guide to help you decide which is the right one for you.
Sheet bands
Sheet bands are thin sheets of latex rubber that are mostly used for rehab, stretching, or warming up. Sheet bands offer the least resistance and are a good option if you’re just getting started or recovering from an injury.
Loop bands and mini bands
Loop bands are enclosed bands that look like a large rubber band. They vary in size, shape, and color. Large loop bands work well for upper body and lower body exercises, although they can be difficult for beginners since they do not have handles. Mini bands are a form of loop bands, but are much smaller in size; mini bands work best for lower body exercises that would normally be done with bodyweight. Mini bands are a great way to add a challenge to your workout and help build muscle. For example, you could add a mini band to your glute bridge to set your glutes medius muscle on fire—in a good way!
Tube bands
Tube bands are made of dense tubes of rubber and are arguably the most popular type of exercise bands because of the handles at the ends of the band make them easy to use. This type of band is great for upper body workouts, like the bicep curl or lateral raises. They also come in different sizes and thicknesses, so you can play around with varying resistance levels depending on your ability or mood.
Before starting: What to know
Okay, let’s pause—that was a lot of information. Before we show you our favorite resistance band workout, why don’t we recap what we’ve learned so far.
- When used correctly any type of band will work for this resistance band workout, although we’re biased towards tube bands. If the movement is too easy, shorten the tubing in a variety of ways, like moving your hands, stepping a foot in, or lengthening your stride, to challenge yourself more.
- We recommend performing each movement in a slow, controlled manner. Make sure to wear supportive shoes and get a solid hold on the band before pulling. Choose smooth flooring as well; a rough surface could scratch or wear down the tubing, which will compromise its structure and safety. Always double-check that your band is secure before pulling.
Resistance bands are there for you anywhere, anytime. If you haven’t already, it’s time to give this versatile piece of equipment a try! Here’s one of our tried-and-true resistance band workouts to get you started.
Full-body resistance band workout
For each exercise, perform 3 sets of 15 repetitions, resting 45 seconds between sets.

- Stand upright with your feet hip-distance apart. With your right foot on the center of the band, hold the handles at the ends of the band at your shoulders, with your elbows bent.
- Take a step backward with your left foot, dropping your left knee almost to the floor and leaning your torso slightly forward, with your weight on your right leg.
- Step your left foot back up to starting position while maintaining your weight on your right leg. Be sure to keep the handles at your shoulders throughout.
- Complete all 15 reps with your right leg on the center of the band, and then switch to your left leg.

- Place both feet on the band, somewhere between shoulder-width and hip-width apart. Bend forward at your waist (don’t forget to bend knees, too), and keep your upper back and lower back flat. Criss-cross the handles so that the band makes an “X” when you hold them.
- Lift both handles up to your armpits at the same time, keeping your elbows pointed behind you. Be sure to squeeze your shoulder blades and upper back muscles and pause at the top of the move for an extra bonus.
- Lower the handles back to a straight arm position, keeping your core engaged and upper body flat throughout. Repeat!
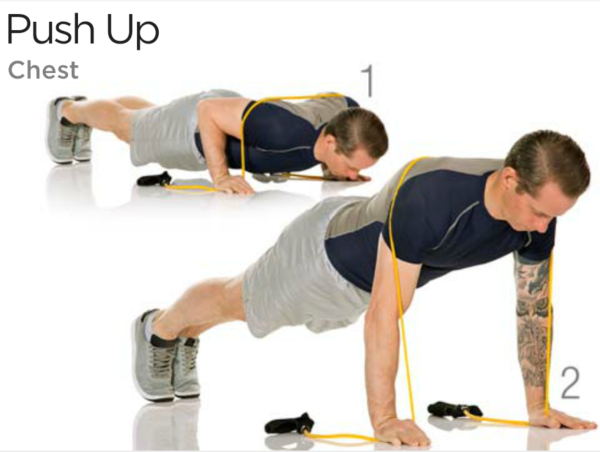
- Get into a traditional push-up position, with your feet together, arms shoulder-width apart and core tight. Pause and make sure you can draw a straight line from your upper body down through your lower body.
- Wrap the tubing across your shoulder blades and bring the ends of the band to the inside of your hands. Hold the band tight and secure it under your hands—be sure to keep even pressure in both your right hand and left hand as you lower yourself to the floor. Your elbows should bend to make a 90-degree angle.
- Push up to a straight arm position, being sure to keep a slight bend in your elbows.

- To start, stand upright on the center of the band with your feet shoulder-width apart, holding the handle with your left hand at shoulder level, and your right hand extended overhead. Your right elbow should be at your ear.
- Press your left hand up, while simultaneously lowering your right hand down to shoulder level. Both handles should be moving at the same time, but in opposite directions. Your palms should face in at all times.

- Stand upright on the middle of the tubing, with your feet hip-width to shoulder-width apart—there should be a slight bend in your knees. Hold the handles underhanded with your hands down near your hip-area, also known as the gluteus medius muscle.
- Raise the handles up to shoulder height, keeping your elbows at your sides, similar to the bicep curl. The difference is that your palms should be facing away from you.
- Lower the handles back to a straight arm position.
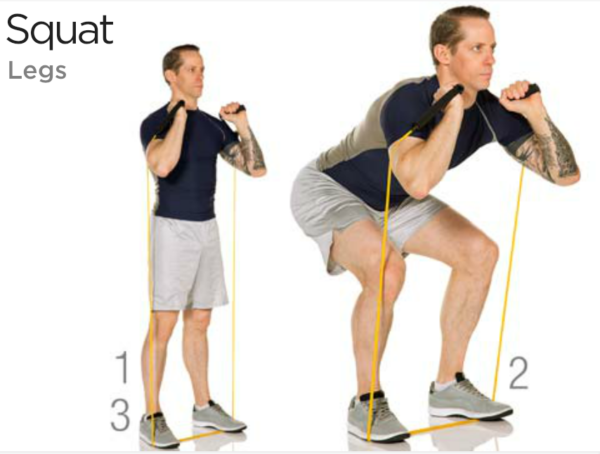
- Stand upright with your feet in the middle of the tubing, placed either hip-width or shoulder-width apart. Hold the handles at your shoulders, with your elbows bent.
- Squat down, while engaging your core to keep your upper back and chest up. Sit back and bend knees until your lower body makes a 90-degree angle. Your hands should stay in front of you at shoulder-width apart.
- Push up through your heels to return to the start position, keeping your back flat throughout.

- Lie on your back and put your left foot in one handle and your right foot in the other. Your hands should be flat on the floor.
- Push your feet up toward the ceiling, raising your hips and lower back off the floor, keeping your hands pressed against the floor for balance. Use your core muscles to pull yourself up—do not push with your hands.

- Stand in the middle of the tubing with your feet shoulder-width apart—don’t forget to bend knees! If that is uncomfortable, try bringing your feet hip-width apart instead. Criss-cross the handles so the band forms an “X” in front of your lower body. Your left hand should be holding the handle that came from under your right foot and vice-versa.
- Fly the handles up and outward to shoulder height, keeping your back flat.
- Lower the handles back to the start position in front of your left and right knee.

- Get into the side plank position so that your right hand and right foot are supporting your body on the floor. Your left leg should be resting on top of your right leg. Your right elbow should be pointed behind you.
- Secure the band under the hand on the floor. Grab the other handle with your left hand and bring it to your right leg or hip.
- Pull the handle across your body and up to the ceiling so the stretched band is directly in front of your chest. Slowly lower the handle back to starting position.
- Complete all reps on one side before switching to the other side.
If you like routines that you can do anytime, anywhere—like this resistance band workout—you’ll love our living room-friendly bodyweight workout!