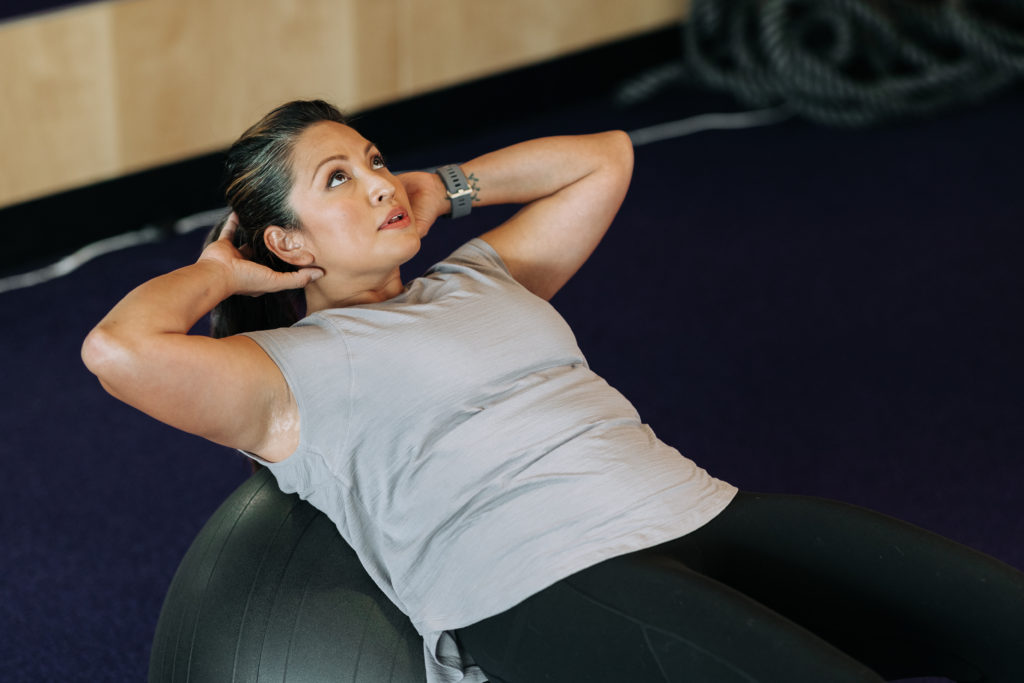
You know that large, often brightly colored ball you see around the gym, that’s somewhere between knee and thigh height? That’s a stability, or Swiss, ball. You may also hear it referred to as a therapy ball, birth ball, balance ball, exercise ball, fitness ball or body ball… there’s lots of variants but for this article, we’re going with stability ball. The stability ball is an extremely versatile tool that is often underutilized. Including effective stability ball exercises in your workouts can enhance core function and test your balance. And if you need any more convincing, there’s plenty of research and information around the fact that improving your core stability can help reduce injury.
Related: Dynamic Core Workout in Just 10 Minutes (Minimal Equipment)
It’s amazing how many common exercises you can modify to include a stability ball – and make more difficult, too! We think a lot of people will be surprised at how many of these moves, like push-ups, mountain climbers, and glute bridges, are quite familiar. We think you’ll also be surprised at how much more difficult they can be on a stability ball!
Today’s 25-minute workout content focuses on a full-body burn that supports your overall strength and balance. For maximum results, see if you can push through the entire circuit of exercises before taking a break. But remember, when you’re performing stability ball exercises, proper form and posture is extremely important. Take special care when your balance is tested by these activities!
Stability Ball Workout
What you need: You don’t need any weights for this workout – just your bodyweight and the ball! If your feet slip at any point, grab a yoga mat – you might also want a yoga mat for extra cushion during the exercises that require you to lie on the floor.
Time: 25 minutes
Recommended Intensity: We recommend performing 12 repetitions of exercise in a set. Perform all the exercises in order before taking a break, then repeat, with a 60 second rest in between the first round and second round. If you’re a stability ball beginner, feel free to adapt this workout to your own fitness level. If you need to take a pause in between sets, no worries. Practice makes perfect, and after a few weeks, you’ll be amazed at how your balance improves!
Here’s a tip on making stability ball exercises a little easier: put the ball up against a wall. How much of the wall you use is up to you – you can either have the ball just touching the wall, or you can have a few inches of its surface making contact. The wall gives the ball some support, and prevents it from rolling every which way, but still includes a stability challenge for you! As always, check in with your doctor about any health conditions you might have and corresponding information you need to know before trying a new workout.
1. Split Squat
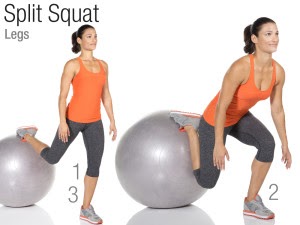
Split squats, also known as Bulgarian split squats, are a great exercise for your lower body, particularly your quads. You might have tried them on a chair or bench before, but doing them on an exercise ball adds an extra balance challenge!
- For this move, stand on your left foot, with your right foot on an exercise ball behind you and your arms at your sides.
- Bend your left leg to drop your body down toward the floor, bending at your hips and knees and leaning your torso slightly forward.
- Push off your left foot to return to the starting position. Try not to push off your right foot – you want to push off the ground, rather than off the exercise ball. Complete all repetitions on one side before switching to the other.
2. Push-Up
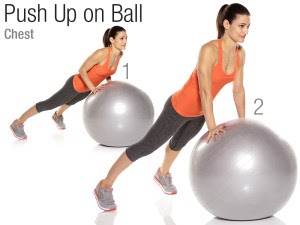
Push-ups are one of the most effective bodyweight exercises around – which means they’re also one of the most effective stability ball exercises. If push-ups are challenging for you, you can always start by performing them on the ground, and work your way toward using an exercise ball.
- Support your body with your hands on the ball, elbows bent and chest nearly touching it, with your legs straight out, on your toes. Keep your spine in a straight line – you’ll feel your entire body working hard here!
- Push up through your palms to a straight arm position (this should feel like a plank position), keeping your back flat and your hips in line with your shoulders throughout.
- Pause at the top, then lower your body back to the start position and repeat. If you can’t get to 12 repetitions, no worries – just do as many as you can.
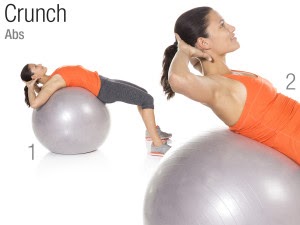
3. Ab Crunch
You’ve tried crunches before. But have you tried exercise ball crunches? Adding an unstable surface to your traditional crunch routine is a great way to fire up your core muscles and build core strength, which is what makes this exercise ball workout move so effectively.
- Lie with the center of your back on the ball, hands at the sides of your head and your feet flat, knees bent.
- Lift your head and shoulders off the ball, contracting your abdominal muscles. Make sure you don’t pull your head up with your hands – this is bad for your neck, and it won’t help work your core muscles! Your goal is to lift up until your shoulder blades are off the ball.
- Lower your head and shoulders and repeat.
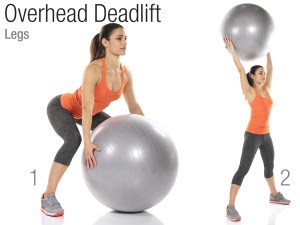
4. Overhead Deadlift
You can deadlift a lot of things – barbells, dumbbells, even suitcases – but we bet you’ve never deadlifted as part of an exercise ball workout! While fitness balls may not be very heavy, they have shape and size on their side, and maneuvering them can be a challenge! This is a great move for your thighs and butt.
- Start in a squat position with your pelvis back, holding the ball on the ground in front of you. Use the circles on the ball to guide your left and right hand to about the middle of the ball.
- Push through your lower body to stand upright and lift your ball overhead, extending your arms fully.
- Lower the ball back to the floor, returning to the squat position.
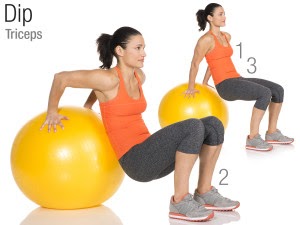
5. Tricep Dip
Tricep dips are a great way to target your triceps, and doing them as a stability ball exercise doubles the challenge! Aim to bend your elbows at 90-degree angles, as pictured. If 90-degree angles are too challenging, just do your best and keep practicing. Tip: if you need to modify, you can practice dips using a bench or a chair until you’re ready for the fitness ball.
- Place your palms on the ball behind you, with your arms straight, feet flat on the ground in front of you.
- Lower your body down, bending at the elbows and knees until your lower back touches the ball.
- Pause for a moment, then push up, returning to the starting position.

6. Mountain Climber
Whether you love them or hate them, mountain climbers are an effective core and cardio exercise, and a great way for beginners to get used to stability balls. For this exercise, you’ll start in plank position, then alternate bringing your knees in toward the ball. Mountain climbers are a great exercise ball workout because by lifting your legs up, you’re constantly challenging your stability. It’s important to keep your spine, hips and pelvis in a straight line to get the most out of this exercise – make sure you’re not rounding your back! The faster you perform this exercise, the more cardio you’ll get out of it – you might even be gasping for air!
- Place your hands on the ball, with your arms straight and legs straight out behind, resting on your toes.
- Bring one knee in toward the ball, keeping the rest of your body in the push-up position. Stop before your shin hits the ball.
- Straighten this leg and repeat on the other side. Keep your back flat and your hips in line with your shoulders throughout.
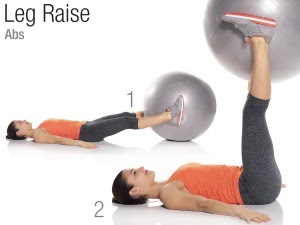
7. Leg Raise
This stability ball exercise might look intimidating, but with a little practice, you’ll be a pro in no time! Regular leg raises are great for working your abs and lower body, but adding a fitness ball really makes your thighs and butt work. Not only do you have to focus on lifting the ball, you have to make sure you don’t drop it! Try to center the ball at your feet, so that the top of the ball comes to your shins. The goal with this exercise is to make a right angle between your legs and your stomach, as pictured, but it’s OK if you can’t get all the way there. Just lift as high as your flexibility allows, and if you need to, you can ditch the exercise ball.
- Lie on your back with your legs straight and the ball between your feet, resting on the ground. Keep your hands by your sides with your palms down.
- Raise your legs up in a straight line, slightly lifting your lower back off the floor, and bring the ball towards the ceiling. Pause at the top if you need a second of rest.
- Lower your legs to tap the ball on the floor and repeat, keeping your upper body stable and your legs straight throughout the movement.
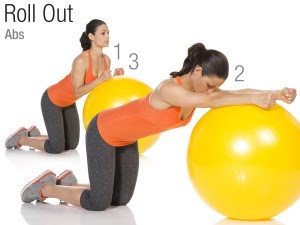
8. Roll Out
If you’ve ever used an ab wheel or ab roller, this exercise shares that same concept. Instead of holding handles, though, you’ll use your forearms to roll out on the exercise ball, then bring it back in. Ab roller movements can be pretty challenging, so beginners may only be able to roll forward a couple inches at first. No worries – after a few weeks of adding this exercise to your fitness routine, you’ll build up to rolling all the way out! Make sure you start with your knees at a 90-degree angle, so that you have space to extend. You’ll definitely feel your hamstrings and quads working to keep you stable. Also keep an eye on your posture, and make sure that you’re rolling out in a straight line so that you’re not putting your spine at risk!
- Kneel on the floor with your forearms on the ball and your chest on your forearms.
- Push the ball forward, rolling it along your forearms as you extend your arms, keeping your back neutral/flat.
- Pull the ball back to the start position.
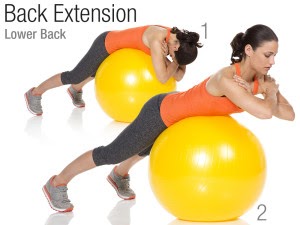
9. Back Extension
You don’t need a fancy machine for this back movement. You’re going to feel this one primarily in your back and shoulder blades, but also in your butt and hamstrings, which will be working to stabilize you. And speaking of muscles, make sure you’re not lifting with your neck – instead, protect your neck by letting your head rise up as you contract your back muscles. With this move, it might feel like you’re only moving a few inches – and that’s how it should feel! Know that those few inches are strengthening your core and back.
If this is too challenging on a stability ball, here’s a tip: try performing supermans on the ground, instead. If you want to make this move more challenging, you can level up by holding a small dumbbell or weight plate at your chest. But remember, proper form comes first!
- Lie face down with your stomach and chest on the ball, your arms crossed over your upper chest, and your legs straight out behind.
- Raise your chest up off the ball, coming to an upright position.
- Do not bounce up and down on the ball as you perform each rep.

10. Glute Bridge
We bet you’ve never glute bridged like this!
- Lie on your back with your heels on the ball, legs straight and your hands at your sides.
- Raise your hips toward the ceiling, making a straight line from your feet to your shoulders.
- Lower your body back to the floor and repeat.
